Base Platform  /  Code Snippet Archive

Code Snippet & Reference Library

Battle-tested, copy-pasteable snippets across PHP, Python, JavaScript, VB.NET, SQL and Bash — compiled from real SaaS engineering sessions.

469
Snippets Indexed
2
PHP
0
JavaScript
7
Python

Showing 469 snippets

SNP-2025-0017 Guides 2026-06-12

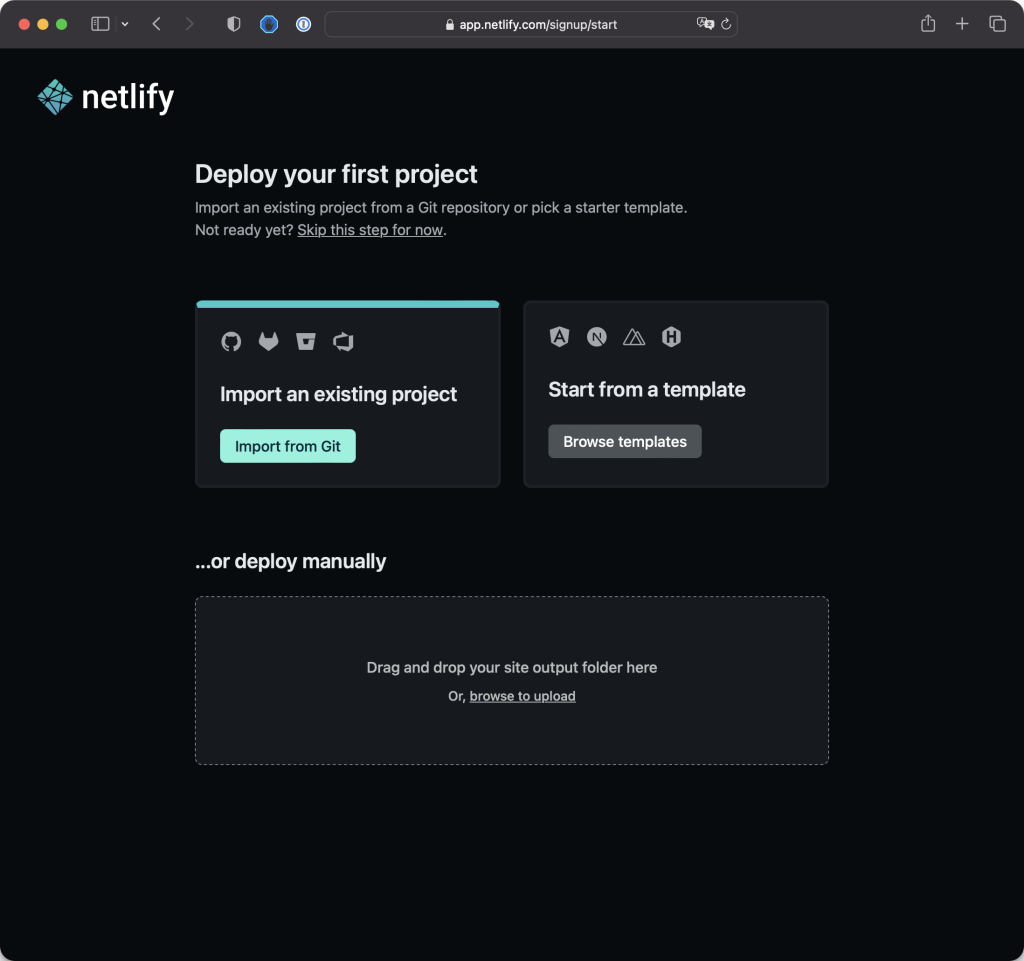
Final steps to Deploy on Netlify

THE PROBLEM
Select import method
  1. Clicked on "Import from Git" on Netlify.
  2. Chose GitHub and authorized Netlify to access GitHub repositories.
  1. Picked the GitHub repository you want to deploy.
  2. Clicked "Deploy site" on Netlify.
Allow Access
  1. Netlify proceeded to deploy the site using the code from the GitHub repo.
  2. You monitored the deployment progress on Netlify.

View Live Site:

  1. The site was successfully deployed on a .netlify.app domain.
  2. You viewed your live site on the provided domain.
  1. Netlify automatically detected the change and redeployed the site.
  2. You saw the changes live on the .netlify.app domain.
Import from Github
  • Custom Domain: Consider buying and assigning a custom domain if your project becomes more serious. Netlify allows easy integration with custom domains.
  • Automated Deployment: The beauty of this setup is the automatic deployment. Every time you make changes, commit, and push to GitHub, Netlify takes care of deploying the updates.
  • Productivity Boost: This automated deployment process enhances productivity by eliminating manual deployment steps.

Congratulations on successfully deploying your site! If you have any further questions or if there's anything else you'd like to explore, feel free to ask. Happy coding!

Open Full Snippet Page ↗
SNP-2025-0247 D code examples D programming 2026-06-12

How Does D Programming Achieve High Performance and Safety Simultaneously?

THE PROBLEM

In the modern landscape of programming languages, the need for both performance and safety has become increasingly crucial. D programming language stands out as a compelling choice, offering a blend of low-level control reminiscent of C/C++ while incorporating features that promote safety and ease of use. This post explores how D achieves high performance and safety simultaneously, addressing core technical concepts, implementation details, and advanced techniques.

Developed by Walter Bright at Digital Mars, D was first released in 2001. It was designed to address the shortcomings of C and C++, particularly in areas such as memory management, code safety, and programmer productivity. D's evolution has been driven by the need for a language that retains the efficiency of low-level programming while embracing modern programming paradigms. Over time, D has incorporated many features that facilitate high performance while ensuring safety, making it a unique player in the programming world.

To understand how D achieves high performance and safety, it's essential to explore its core technical concepts:

  • Static Typing: D uses static typing, which allows the compiler to catch type errors at compile time, enhancing code safety.
  • Garbage Collection: D features automatic memory management through garbage collection, which helps prevent memory leaks and dangling pointers.
  • Compile-Time Function Execution: D supports metaprogramming, enabling code execution at compile time to optimize performance.
  • Design by Contract: This feature allows developers to define preconditions, postconditions, and invariants, leading to safer code.

Security is paramount in software development, and D incorporates several features to enhance security:

  • Type Safety: D's static typing helps prevent type-related vulnerabilities.
  • Design by Contract: This feature allows developers to enforce rules and invariants in the code, reducing the chance of runtime errors.
  • Immutable Data Structures: D supports immutable data types, which can help prevent unintended modifications and security vulnerabilities.

Here's an example of using Design by Contract to ensure safety:

void divide(int numerator, int denominator) {
    assert(denominator != 0, "Denominator must not be zero");
    // Perform division
}

Understanding how D compares to other programming languages can provide insight into its strengths:

Feature D C++ Rust
Memory Management Automatic & Manual Manual Strict Ownership
Safety High Medium Very High
Performance High Very High High
Metaprogramming Strong Moderate Limited

Here are some practical tips for developers working with D:

  • Leverage D's Standard Library: The D standard library is rich and provides many features that can save time and effort.
  • Use @safe and @trusted: Utilize these attributes to mark functions for safety, helping the compiler enforce safety guarantees.
  • Profile Regularly: Use profiling tools to identify performance bottlenecks early in the development process.
💡 Tip: Regularly revisit your code for refactoring and optimizations, especially after major changes.

1. What are the primary advantages of using D over C/C++?

D offers a higher level of safety, better memory management options, and modern programming features while retaining performance comparable to C/C++.

2. How does D's garbage collector work?

D's garbage collector automatically manages memory by tracking allocations and deallocations, reclaiming memory that is no longer in use.

3. Can D be used for systems programming?

Yes, D is well-suited for systems programming due to its performance and low-level access, similar to C and C++.

4. What is Design by Contract in D?

Design by Contract is a programming methodology that allows developers to define formal, precise, and verifiable interface specifications in the form of preconditions, postconditions, and invariants.

5. How does D handle concurrency?

D provides built-in support for concurrency through its thread library and higher-level constructs, making it easier to write concurrent code safely.

If you're new to D programming, follow these steps to kick-start your journey:

  1. Install DMD: Download and install the DMD compiler from the official D language website.
  2. Set Up Your IDE: Use an IDE like Visual Studio Code with D extensions for a better development experience.
  3. Create Your First Program: Write a simple "Hello, World!" program to familiarize yourself with the syntax.
    import std.stdio;
    void main() {
        writeln("Hello, World!");
    }
  4. Explore the Standard Library: Take the time to explore the D standard library, as it contains many useful modules.
  5. Join the Community: Engage with the D community through forums and social media to learn from others and share your experiences.

In conclusion, D programming language successfully bridges the gap between high performance and safety, making it a suitable choice for a variety of applications. By understanding its core concepts, leveraging optimization techniques, and adhering to best practices, developers can harness the full potential of D. As the language evolves, it continues to attract attention for its unique capabilities, positioning itself as a formidable alternative to more traditional programming languages.

PRODUCTION-READY SNIPPET

When using D, developers may encounter common pitfalls that can affect performance and safety:

  • Overusing Garbage Collection: Excessive reliance on garbage collection can lead to performance issues. It's crucial to identify performance-critical sections and manage memory manually when necessary.
  • Ignoring Compile-Time Features: D's metaprogramming capabilities can lead to significant performance improvements. Failing to leverage these features can result in missed optimizations.
Best Practice: Profile your application to identify bottlenecks and determine when to switch between garbage collection and manual memory management.
PERFORMANCE BENCHMARK

D offers several performance optimization techniques that developers can leverage:

💡 Tip: Use the @nogc attribute to indicate that a function does not perform garbage collection, enhancing performance in performance-critical sections of code.

Here’s an example demonstrating a performance-critical function in D:

@nogc void processCriticalData() {
    // Performance-sensitive operations
    // No garbage collection or allocation
}

D provides developers with explicit control over memory management, similar to C/C++, while also offering automatic garbage collection. This dual approach allows developers to choose between manual management for performance-critical sections and automatic management for easier coding.

⚠️ Warning: Relying solely on garbage collection can lead to unpredictable performance, especially in real-time systems.

Here's how you can manage memory in D:

void* myMemory = malloc(100); // Manual management
// Use myMemory...
// Free the memory
free(myMemory);

Alternatively, you can use D's garbage collector:

import core.memory;
void myFunction() {
    auto myArray = new int[100]; // Automatic management
    // Use myArray...
    // No need to free, handled by garbage collector
}
Open Full Snippet Page ↗
SNP-2025-0116 HTML code examples Html programming 2026-06-11

How Can You Effectively Structure and Optimize Your HTML for Modern Web Applications?

THE PROBLEM

In the fast-evolving world of web development, understanding how to effectively structure and optimize HTML is crucial for building modern web applications. HTML, or HyperText Markup Language, serves as the backbone of web content. Yet, many developers overlook its optimization, which can lead to performance issues and poor user experience.

The structure of your HTML is vital for both search engine optimization (SEO) and accessibility. Properly structured HTML helps search engines index your content more effectively, while also ensuring that assistive technologies can interpret your site correctly. This section will explore the foundational concepts of HTML structure, including the significance of semantic HTML.

Semantic HTML refers to the use of HTML markup to reinforce the meaning of the content. It uses HTML elements according to their intended purpose. For instance, using <header> for header content, <article> for articles, and <footer> for footer content enhances the clarity and structure of the webpage.

💡 Tip: Using semantic HTML can improve your website's SEO and accessibility. Search engines and screen readers understand the structure better when elements are used semantically.

<header>
    <h1>Welcome to My Website</h1>
    <nav>
        <ul>
            <li><a href="#home">Home</a></li>
            <li><a href="#about">About</a></li>
        </ul>
    </nav>
</header>

When structuring HTML, consider the following best practices:

  • Use a logical hierarchy with headings (<h1> to <h6>).
  • Group related content using sections like <section> and <article>.
  • Ensure each page has a unique <title> and <meta description>.
  • Use lists (<ul>, <ol>) for grouping items.

Here’s an example demonstrating proper structure:


<section>
    <h2>Our Services</h2>
    <article>
        <h3>Web Development</h3>
        <p>We create stunning websites using the latest technologies.</p>
    </article>
    <article>
        <h3>SEO Services</h3>
        <p>Optimize your website for better search engine rankings.</p>
    </article>
</section>

Building accessible web applications is not just a legal requirement; it’s also a best practice that benefits all users. Here are key considerations:

  • Use alt attributes for images to describe their content.
  • Ensure all interactive elements are keyboard accessible.
  • Utilize ARIA (Accessible Rich Internet Applications) roles and properties where appropriate.

<button aria-label="Close">X</button>

While HTML is the foundation, modern web applications often utilize frameworks for enhanced functionality. Here’s a brief comparison of popular frameworks:

Framework Pros Cons
React Component-based architecture, large community Steeper learning curve
Vue.js Easy to integrate, flexible Lesser community support than React
Angular Comprehensive framework, strong tooling Verbose syntax

HTML is continuously evolving. The most recent specifications have introduced new elements and attributes that enhance the language's capabilities:

  • Custom Elements: Allow you to define new HTML elements.
  • Shadow DOM: Enables encapsulation of styles and markup.
  • HTML5 APIs: Such as the Geolocation API and Web Storage API, are becoming standard.

If you are new to HTML, here’s a quick-start guide to help you get your first webpage up and running:


<!DOCTYPE html>
<html lang="en">
<head>
    <meta charset="UTF-8">
    <meta name="viewport" content="width=device-width, initial-scale=1.0">
    <title>My First Webpage</title>
</head>
<body>
    <h1>Hello World!</h1>
    <p>Welcome to my first webpage.</p>
</body>
</html>

1. What is the purpose of the <head> element?

The <head> element contains metadata about the HTML document, including the title, links to stylesheets, and scripts.

2. How can I make my website mobile-friendly?

Use responsive design techniques, such as fluid grids and media queries, to ensure your website adapts to various screen sizes.

3. What are HTML entities, and why are they important?

HTML entities are used to represent special characters that cannot be typed directly. They ensure that these characters are displayed correctly in the browser.

4. How does the viewport meta tag affect my website?

The viewport meta tag controls the layout on mobile browsers, allowing you to set the visible area of your webpage.

5. What is the significance of the alt attribute in images?

The alt attribute provides alternative text for images, improving accessibility for screen readers and SEO.

In summary, structuring and optimizing your HTML is essential for creating modern web applications that are both functional and user-friendly. By applying semantic HTML, following best practices, and understanding common pitfalls, you can significantly enhance the performance and accessibility of your web projects. As web standards evolve, staying informed about new developments will help you maintain high-quality web applications. Remember, effective HTML is the foundation for successful web experiences!

PRODUCTION-READY SNIPPET

Even seasoned developers encounter common HTML errors. Here are a few examples, along with their solutions:

Error Solution
Missing doctype declaration Add <!DOCTYPE html> at the beginning of your HTML file.
Incorrectly nested elements Ensure that elements are closed properly and in the correct order.
Missing alt attributes on images Always include descriptive alt attributes for accessibility.
PERFORMANCE BENCHMARK

Optimizing your HTML is essential not only for performance but also for user experience. Here are several techniques to consider:

  • Minification: Reduce the size of your HTML files by removing unnecessary spaces, comments, and line breaks.
  • Lazy Loading: Use lazy loading for images and videos to improve page load speed.
  • Reduce HTTP Requests: Combine multiple CSS and JS files to decrease the number of requests.
⚠️ Warning: Always test your site after making optimizations to ensure that functionality remains intact.

<img src="image.jpg" loading="lazy" alt="A description of the image">
Open Full Snippet Page ↗
SNP-2025-0447 Sass code examples programming Q&A 2026-06-11

How Can You Leverage Sass to Streamline Your CSS Workflow?

THE PROBLEM

In the ever-evolving world of web development, managing CSS can often become a daunting task, especially as projects grow in complexity. This is where Sass (Syntactically Awesome Style Sheets) comes in. Sass is a powerful preprocessor that extends CSS with features like variables, nested rules, and mixins, allowing developers to write cleaner, more maintainable stylesheets. But how can you truly leverage Sass to streamline your CSS workflow? This post will delve into the various aspects of Sass that can enhance your workflow, from its core features to advanced techniques, practical tips, and more.

Sass is a CSS preprocessor that adds functionality to the standard CSS language. By compiling Sass files into standard CSS, developers can write more efficient, organized styles. Sass supports two syntaxes: the indented syntax (Sass) and SCSS (Sassy CSS), which is a more CSS-like syntax. The choice of syntax depends on personal preference, but SCSS is widely adopted due to its familiarity.

Understanding the core features of Sass is crucial for streamlining your CSS workflow. Here are some of the most important features:

  • Variables: Store values like colors, fonts, or any CSS value in a variable for reuse throughout your stylesheets.
  • Nesting: Write CSS rules within other rules, making the stylesheet more intuitive and easier to read.
  • Mixins: Create reusable blocks of code that can accept parameters, reducing redundancy.
  • Inheritance: Use the @extend directive to inherit styles from one selector to another.
  • Partials and Imports: Split your CSS into smaller, manageable files and import them into a main stylesheet.

To begin using Sass, follow these simple steps:

  1. Install Sass: You can install Sass via npm, Ruby gem, or other package managers. Here's how to install it using npm:
npm install -g sass
  1. Create a Sass file: Create a file with a .scss extension, for example, styles.scss.
  2. Compile Sass to CSS: Use the command line to compile your Sass file into CSS:
sass styles.scss styles.css

Now, you can link styles.css in your HTML file and start writing Sass!

Variables allow you to define reusable values that can be used throughout your stylesheets, improving consistency and maintainability. Here's how to use variables:

// Defining variables
$primary-color: #3498db;
$font-stack: 'Helvetica Neue', sans-serif;

// Using variables
body {
    font-family: $font-stack;
    background-color: $primary-color;
}

By using variables, changing a color or font across your entire stylesheet becomes as simple as updating a single line.

Nesting allows you to write CSS more logically and intuitively. Consider this example:

nav {
    ul {
        list-style: none;
    }
    li {
        display: inline-block;
    }
    a {
        text-decoration: none;
    }
}

This structure clearly shows the relationship between the elements, making the code easier to read and maintain.

Mixins are a powerful feature of Sass that enable you to encapsulate styles in reusable blocks. Here's how you can create a mixin:

@mixin border-radius($radius) {
    -webkit-border-radius: $radius;
    -moz-border-radius: $radius;
    border-radius: $radius;
}

.box {
    @include border-radius(10px);
}

By creating a mixin for border-radius, you ensure consistent styling throughout your project while also making it easy to update.

Inheritance and partials can greatly enhance your Sass workflow. The @extend directive allows one selector to inherit styles from another, which can reduce code duplication:

.button {
    padding: 10px 15px;
    border: none;
    color: white;
}

.primary-button {
    @extend .button;
    background-color: blue;
}

Using partials, you can split your Sass into smaller files and import them wherever needed:

// _variables.scss
$font-stack: 'Arial', sans-serif;

// styles.scss
@import 'variables';

body {
    font-family: $font-stack;
}

When using Sass, it's essential to consider security implications:

Sanitize user inputs: If your Sass variables are influenced by user input, always sanitize to prevent injection attacks.

Also, be cautious about using external libraries and ensure they are from trusted sources to avoid vulnerabilities in your projects.

1. What are the main benefits of using Sass over plain CSS?

Sass provides features such as variables, nesting, and mixins that enhance organization, maintainability, and reusability, making it easier to manage complex stylesheets.

2. Can I use Sass with any framework?

Yes, Sass can be integrated into most front-end frameworks and build tools, including React, Vue, Angular, and even in PHP frameworks like Laravel.

3. What is the difference between Sass and SCSS?

Sass is the indented syntax while SCSS is a CSS-like syntax. Both compile to CSS, but SCSS is more widely used due to its familiarity.

4. How do I troubleshoot common Sass errors?

Check the console for error messages, ensure all files are properly linked, and verify that your syntax is correct. Using a linter can also help catch issues early.

5. What tools can I use to compile Sass?

Some popular tools for compiling Sass include Node-sass, Dart Sass, Gulp, Webpack, and Grunt. Choose one that fits into your workflow.

Leveraging Sass effectively can significantly streamline your CSS workflow, making it more efficient and maintainable. From the foundational features like variables and nesting to advanced techniques such as mixins and partials, Sass equips developers to handle complex styling with ease. By understanding common pitfalls and applying best practices, you can optimize your development process and ensure your stylesheets remain clean and organized.

As web development continues to evolve, staying updated with the latest features and practices in Sass will empower you to create stunning, responsive designs that stand the test of time. Happy styling!

PRODUCTION-READY SNIPPET

While Sass offers many advantages, there are common pitfalls to be aware of:

⚠️ Over-nesting: Avoid nesting too deeply to prevent overly specific selectors that can lead to CSS bloat.

Here's an example of over-nesting:

.header {
    .nav {
        .menu {
            li {
                a {
                    color: red;
                }
            }
        }
    }
}

Instead, simplify your structure to improve performance and readability:

.header .nav .menu li a {
    color: red;
}
PERFORMANCE BENCHMARK

To optimize your Sass for performance:

  • Use the --style flag: When compiling Sass, use the --style flag to control the output style (compressed, nested, expanded).
  • Minimize HTTP requests: Use partials wisely to group styles into fewer files.
  • Leverage caching: Use a build tool like Gulp or Webpack to compile your Sass only when changes are made.
Open Full Snippet Page ↗
SNP-2025-0433 Qore code examples programming Q&A 2026-06-11

How Can You Harness Qore's Unique Features for Efficient Scripting in Complex Applications?

THE PROBLEM

Qore is a powerful high-level programming language designed for rapid application development, particularly in areas such as web applications, network programming, and system administration. Its unique features, including built-in support for complex data types, dynamic typing, and an extensive standard library, make it an excellent choice for developers looking to create efficient scripts for complex applications. This post will explore how to leverage Qore's capabilities, providing practical tips, code examples, and best practices.

Qore was created in the late 1990s by the Qore Development Team as a scripting language for use in various applications, including web and network programming. It was influenced by languages such as Perl and Python, aiming to combine the best features of both while introducing its unique elements. Over the years, Qore has evolved, gaining a dedicated user base and becoming particularly popular in the fields of DevOps and automation.

Today, Qore is known for its ease of integration with C/C++ libraries, making it a versatile choice for developers needing to interface with existing codebases or system-level components.

Understanding Qore's core concepts is crucial for harnessing its full potential. Key features include:

  • Dynamic Typing: Variables in Qore do not require explicit type declarations, allowing for greater flexibility in coding.
  • Data Types: Qore supports a variety of data types, including strings, arrays, hashes, and objects, making complex data handling straightforward.
  • Modules: Qore's module system enables developers to organize code efficiently, promoting reusability and maintainability.
  • Exception Handling: Qore offers built-in exception handling, making it easier to manage errors and maintain robust applications.

Once you're comfortable with the basics, you can explore advanced Qore features such as object-oriented programming (OOP) and asynchronous programming. For instance, Qore supports classes, inheritance, and polymorphism, allowing for complex application architectures.


class Animal {
    string name;
    
    Animal(string name) {
        this.name = name;
    }
    
    void speak() {
        printf("%s makes a noise.n", this.name);
    }
}

class Dog : Animal {
    Dog(string name) : Animal(name) {}

    void speak() {
        printf("%s barks.n", this.name);
    }
}

my Dog dog = new Dog("Buddy");
dog.speak();  # Output: Buddy barks.

In this code, we define a base class `Animal` and a derived class `Dog`. The `speak` method is overridden in the `Dog` class, demonstrating polymorphism. This allows for cleaner code organization and easier maintenance.

To write efficient Qore applications, consider the following best practices:

  • Use Modules: Organize your code into modules to improve readability and maintainability.
  • Leverage Exception Handling: Always use try-catch blocks to manage potential errors gracefully.
  • Document Your Code: Use comments and documentation strings to clarify your logic and implementation.
Tip: Regularly refactor your code to enhance performance and readability.

Security is a critical aspect of any application. Here are some considerations for Qore:

  • Input Validation: Always validate user inputs to avoid injection attacks.
  • Sanitize Outputs: Use Qore's built-in functions to escape output when rendering HTML or other formats.
  • Use Secure Connections: When dealing with network operations, ensure that you are using secure protocols (e.g., HTTPS).
⚠️ Warning: Never trust external data; always sanitize and validate!

While Qore itself is a versatile language, comparing it with frameworks such as Django or Flask for Python can highlight its unique advantages:

Feature Qore Django Flask
Ease of Use Moderate High Moderate
Performance High Moderate Moderate
Flexibility High Low High
Community Support Low High Moderate

Qore's flexibility and performance make it suitable for applications requiring complex logic and high efficiency, while Django excels in rapid development and community support.

1. What are the main use cases for Qore?

Qore is typically used for web development, automation, and system administration tasks due to its flexibility and ease of integration with other languages.

2. How does Qore handle asynchronous programming?

Qore supports asynchronous programming through its event loop, allowing developers to handle multiple tasks concurrently without blocking the execution.

3. Can I use Qore for data science applications?

While Qore is not primarily designed for data science, its capabilities can be leveraged for data manipulation and processing tasks.

4. Is there a strong community for Qore?

The Qore community is smaller compared to languages like Python or JavaScript, but it is passionate and offers support through forums and documentation.

5. How can I debug Qore applications?

Qore provides various debugging tools, including logging and exception handling, which help in tracing issues within applications.

Qore is a unique scripting language that offers powerful features for developers looking to build efficient and robust applications. By understanding its core concepts, employing best practices, and being aware of common pitfalls, you can harness Qore's full potential in your projects. Its flexibility, performance optimization techniques, and security considerations make it an excellent choice for a variety of applications. Whether you're a beginner or an experienced developer, embracing Qore can significantly enhance your scripting capabilities.

PRODUCTION-READY SNIPPET

Like any programming language, Qore has its share of common pitfalls that developers should be aware of:

⚠️ Variable Scope: Be mindful of variable scopes. Variables defined inside a function are not accessible outside it unless explicitly passed as parameters or returned.

Here’s an example of a scope issue:


void exampleFunction() {
    my string localVar = "I am local";
}

exampleFunction();
// printf(localVar);  # This will cause an error

In this case, attempting to access `localVar` outside its defining function would lead to an error. Always ensure you're aware of where your variables are accessible.

REAL-WORLD USAGE EXAMPLE

To effectively use Qore in your applications, it's essential to understand its syntax and structure. Below is a simple example that demonstrates variable declaration, control structures, and function definitions.


# Simple Qore Script
my string name = "Qore";
my int age = 5;

# Function to greet
void greet(string name, int age) {
    printf("Hello, my name is %s and I am %d years old.n", name, age);
}

# Call the function
greet(name, age);

In this example, we define a string and an integer variable and create a function that prints a greeting. Notice how Qore allows us to define the function parameters with types, enhancing code readability and maintainability.

PERFORMANCE BENCHMARK

Optimizing Qore applications can lead to significant performance improvements. Here are some techniques:

  • Profile Your Code: Use Qore's built-in profiling tools to identify bottlenecks.
  • Minimize Memory Usage: Be conscious of large data structures; use references instead of copies where possible.
  • Efficient Data Handling: Utilize hashes and arrays effectively to minimize search times and improve access speed.

For example, using a hash table for frequent lookups can drastically reduce search times compared to a linear search in an array.

Open Full Snippet Page ↗
SNP-2025-0072 Go 2026-06-11

The Ultimate Guide to Go Programming: Expert Q&A on Fundamentals and Advanced Techniques

THE PROBLEM

Go, also known as Golang, was designed by Google engineers Robert Griesemer, Rob Pike, and Ken Thompson and was officially released in 2009. The language was developed to address shortcomings in existing languages like C++ and Java, particularly in the areas of simplicity, efficiency, and concurrency. Go boasts a clean syntax, garbage collection, and built-in support for concurrent programming through goroutines and channels.

  • Statically typed: Go's strong type system helps catch errors at compile time.
  • Concurrency: Lightweight goroutines and channels make concurrent programming straightforward.
  • Fast compilation: Go compiles quickly, enhancing developer productivity.
  • Rich standard library: Offers extensive packages for web servers, I/O operations, and more.
💡 Go is particularly popular for cloud services, DevOps tools, and microservices due to its efficiency and scalability.

To get started with Go, you need to download and install the Go programming language from the official Go website. The installation includes the Go toolchain and the standard library.

Go emphasizes simplicity and clarity in its syntax. Here’s a simple "Hello, World!" program:

package main

import "fmt"

func main() {
    fmt.Println("Hello, World!")
}

This example illustrates the structure of a Go program, including package declarations, imports, and the main function where execution begins.

✅ Make sure to set your GOPATH and GOROOT environment variables correctly to avoid issues when running your Go programs.

Go provides several built-in data types, including integers, floats, booleans, and strings. Here's how you might declare variables:

var age int = 30
var name string = "Alice"
isActive := true // Short variable declaration

The `:=` syntax allows you to declare and initialize variables without explicitly mentioning their types, making your code cleaner and more concise.

Go includes standard control structures — if, for, and switch — which are essential for flow control in programming. The `for` loop is particularly versatile in Go:

for i := 0; i < 5; i++ {
    fmt.Println(i)
}

This loop will print numbers from 0 to 4. Go does not have a `while` loop; instead, you can use a `for` loop with conditions.

Go uses interfaces to define a contract that types must adhere to, promoting flexibility and code reuse. An interface is implemented implicitly, meaning you don’t need to declare that a type implements an interface.

type Animal interface {
    Speak() string
}

type Dog struct{}

func (d Dog) Speak() string {
    return "Woof!"
}

In this example, the `Dog` struct implements the `Animal` interface. This approach encourages a design pattern known as "composition over inheritance."

Concurrency is one of Go's standout features, with goroutines allowing thousands of concurrent functions to be executed. Channels are used for communication between these goroutines:

func sayHello(ch chan string) {
    ch <- "Hello from Goroutine!"
}

func main() {
    ch := make(chan string)
    go sayHello(ch)
    msg := <-ch
    fmt.Println(msg)
}

This example demonstrates how to create a goroutine that sends a message to a channel, which the main function subsequently receives.

Understanding how Go handles memory is crucial for optimizing performance. The garbage collector's efficiency means you don't need to manage memory manually, but you should still be aware of allocation patterns to prevent excessive garbage collection.

⚠️ Avoid creating short-lived objects in tight loops as this can lead to frequent garbage collection pauses.

Organizing your Go code is vital for maintainability. Follow the idiomatic Go structure, which usually includes a `cmd` directory for application entry points and a `pkg` directory for reusable packages.

Go encourages comprehensive documentation through comments. Use GoDoc to generate documentation automatically. Additionally, write tests for your code using the `testing` package:

func TestMyFunction(t *testing.T) {
    result := MyFunction()
    expected := "Expected Result"
    if result != expected {
        t.Errorf("Expected %s, but got %s", expected, result)
    }
}

The Go community continually evolves the language, with improvements in performance and features like generics introduced in Go 1.18. This allows developers to write more flexible and reusable code.

The future of Go looks bright as it continues to gain traction in cloud computing and microservices architecture. The growing ecosystem of libraries and frameworks also enhances its appeal among developers.

🚀 Stay updated by following the official Go blog and participating in community discussions on platforms like GitHub.

This guide has explored the key aspects of Go programming, from basic concepts to advanced techniques. By understanding these principles and following the best practices outlined above, you'll be well-equipped to develop robust, efficient, and maintainable Go applications. Remember that mastering any programming language takes practice and continuous learning. Keep experimenting with the code examples provided and explore the additional resources to further enhance your skills.

COMMON PITFALLS & GOTCHAS

New Go developers often encounter issues such as:

  • Using pointers incorrectly, leading to nil pointer dereferences.
  • Confusing goroutine execution order, which can lead to race conditions.
  • Neglecting error handling, which is critical in Go development.
PERFORMANCE BENCHMARK

Go provides built-in tools for profiling and benchmarking your code. The `testing` package allows you to write benchmarks to measure performance:

func BenchmarkMyFunction(b *testing.B) {
    for i := 0; i < b.N; i++ {
        MyFunction() // Replace with the function you're testing
    }
}

Run the benchmarks using the command go test -bench=. to see performance metrics.

Open Full Snippet Page ↗
SNP-2025-0336 Gcode code examples Gcode programming 2026-06-11

How Can You Effectively Utilize G-code to Maximize CNC Machine Performance?

THE PROBLEM
G-code, the language of CNC (Computer Numerical Control) machines, plays a crucial role in modern manufacturing processes. While it may seem straightforward, mastering G-code programming can significantly enhance the performance of CNC machines and improve production efficiency. This post will delve deep into the intricacies of G-code, exploring its commands, best practices, and optimization techniques that can help you leverage its full potential. Whether you're a beginner looking to start your journey in CNC machining or a seasoned professional aiming to refine your skills, understanding G-code is essential in today’s manufacturing landscape. G-code is essentially a set of instructions used to control CNC machines. Each command in G-code directs the machine to perform specific tasks, such as moving to a certain position, changing the speed, or initiating a tool action. The syntax is quite simple, consisting of letters followed by numbers. For example:
G0 X10 Y20 Z5 ; Rapid move to coordinates X10 Y20 Z5
In this example, `G0` is the command for a rapid move, while `X`, `Y`, and `Z` specify the target coordinates.
💡 Key Point: Understanding the basic G-code commands is essential for effective CNC programming.
Originally developed in the 1950s, G-code has evolved significantly over the years. The initial purpose was to standardize the programming of CNC machines, allowing manufacturers to create more complex components with greater precision. Over time, different industries have adopted various dialects of G-code, such as FANUC, Haas, and Heidenhain, each with its unique command set. Understanding the historical context of G-code helps programmers appreciate its flexibility and the need for continuous learning as technology advances. To effectively utilize G-code, one must grasp the core concepts that govern its functionality: 1. **Coordinates and Axes**: G-code typically operates in a Cartesian coordinate system, with X, Y, and Z representing the three-dimensional space. Understanding this system is vital for programming complex movements. 2. **Modal vs. Non-modal Commands**: Modal commands remain active until changed, while non-modal commands apply only to the specific line they're on. For instance, once you set the feed rate with `F`, it remains in effect until you specify a new one. 3. **Tool Path Generation**: The sequence of G-code commands generates tool paths that dictate how the machine will operate. This includes linear interpolation (`G1`), circular interpolation (`G2` and `G3`), and more. 4. **Safety and Limits**: G-code programming also involves defining limits and safety measures to prevent crashes and damage to the machine.
Best Practice: Always simulate your G-code in software before running it on the machine to avoid costly mistakes.
To become proficient in G-code programming, follow these best practices: - **Comment Your Code**: Use comments to explain complex sections of your G-code, making it easier to understand and modify later.
; This section cuts a rectangle
- **Use Subroutines**: Break down repetitive tasks into subroutines to simplify your code and enhance readability. - **Keep Code Modular**: Structure your programs to allow easy modifications and updates, which is essential for iterative design processes. - **Stay Updated**: G-code dialects can evolve, so keep abreast of the latest features and improvements in your machine's firmware. As technology continues to evolve, G-code programming is likely to undergo significant changes. Emerging trends include: - **Integration with AI**: AI-driven technologies could enhance G-code generation, optimizing paths based on real-time data and machine learning algorithms. - **Increased Automation**: As CNC machines become more automated, the ability to generate dynamic G-code based on parameters could revolutionize the industry. - **Additive Manufacturing**: As 3D printing technology grows, adaptations of G-code will be essential for hybrid manufacturing processes that combine additive and subtractive methods.

1. What is the difference between G-code and M-code?

G-code primarily deals with the movements and actions of the machine, while M-code refers to miscellaneous commands that control other functions, such as starting and stopping the spindle, coolant control, and tool changes.

2. Can G-code be used for 3D printing?

Yes, some 3D printers use a variant of G-code to control their movements and operations, although the specific commands and structure may differ from traditional CNC machining.

3. How do I debug G-code?

Debugging G-code involves running simulations in software, reviewing error codes, and checking for common issues such as missing commands or incorrect syntax.

4. What software can I use to generate G-code?

There are various software options for generating G-code, including CAD/CAM software like SolidWorks, Fusion 360, and specialized G-code generators such as Estlcam and PrusaSlicer.

5. Is G-code programming difficult to learn?

While G-code programming has a learning curve, many find it manageable with practice. Understanding the fundamental principles and regularly applying them in real-world scenarios accelerates the learning process. G-code programming is an invaluable skill in the CNC machining world. By mastering its commands, understanding the underlying principles, and following best practices, you can significantly enhance your CNC machine's performance and efficiency. As technology evolves, staying updated with the latest advancements in G-code will ensure you remain competitive in the industry. Embrace the challenges of G-code programming, and you’ll unlock new potential in your manufacturing processes.
PRODUCTION-READY SNIPPET
Even experienced programmers can encounter errors when working with G-code. Here are some common error codes and their solutions: | Error Code | Description | Solution | |------------|-----------------------------------|-----------------------------------------------| | E001 | Command not recognized | Check for typos in the command. | | E002 | Coordinate out of range | Ensure coordinates are within the machine's limits. | | E003 | Tool not defined | Verify that the tool is correctly set up in the machine. | | E004 | Feed rate too high | Reduce the feed rate to a safe level. | | E005 | End of program without M30 | Ensure every program ends with `M30`. |
REAL-WORLD USAGE EXAMPLE
Writing G-code requires attention to detail and a good understanding of both the machine and the material being worked on. Here’s a simple example of a G-code program that outlines the process of milling a rectangular pocket:
%
O1000 ; Program number
G21 ; Set units to millimeters
G17 ; Select XY plane
G90 ; Absolute positioning
G0 Z5 ; Raise to safe height
G0 X0 Y0 ; Move to start position
G1 Z-5 F100 ; Lower tool into material
G1 X50 Y0 F200 ; Cut to X50
G1 X50 Y50 ; Cut to Y50
G1 X0 Y50 ; Cut to X0
G1 X0 Y0 ; Return to start
G0 Z5 ; Raise tool
M30 ; End of program
%
This example illustrates the typical flow of a G-code program, including setting the units, selecting the working plane, and defining movements.
COMMON PITFALLS & GOTCHAS
Even seasoned programmers can fall into common traps when working with G-code. Here are some pitfalls to avoid: 1. **Ignoring Safety Protocols**: Always include safety moves and check for limits to prevent collisions. Never assume the machine will operate as expected without proper checks. 2. **Overlooking Tool Wear**: Regularly check tool conditions and adjust your G-code for wear to maintain quality and efficiency. 3. **Neglecting Backup**: Always maintain backups of your G-code files to avoid data loss and ensure you can recover previous versions if needed. 4. **Assuming Compatibility**: Be cautious when transferring G-code between different machines or controllers, as dialects may vary significantly.
PERFORMANCE BENCHMARK
To maximize CNC machine performance, consider implementing the following optimization techniques: 1. **Optimize Tool Paths**: Use efficient cutting paths to reduce machining time. This includes minimizing rapid moves and avoiding unnecessary tool changes. 2. **Adjust Feed Rates**: Experiment with different feed rates based on material and tooling to find the optimal balance between speed and quality. 3. **Utilize Tool Compensation**: Implement tool radius compensation to reduce the number of tool changes and improve machining efficiency. 4. **Simulate Before Running**: Always simulate your G-code to identify potential issues and optimize paths before actual machining.
⚠️ Warning: Neglecting simulation can lead to machine crashes and significant downtime.
Open Full Snippet Page ↗
SNP-2025-0176 Asm6502 Asm6502 programming code examples 2026-06-10

How Can You Effectively Utilize the 6502 Assembly Language for Game Development?

THE PROBLEM

The 6502 assembly language, often associated with classic gaming systems like the NES, Commodore 64, and Atari, has a rich history in the realm of game development. As retro gaming experiences a renaissance, understanding how to effectively utilize the 6502 assembly language is more relevant than ever. This post aims to explore the nuances of programming in Asm6502, particularly in the context of developing engaging and performant games.

The 6502 microprocessor, introduced by MOS Technology in 1975, became a cornerstone of early computer and gaming technology. Its affordability and efficiency led to its adoption in various home computers and game consoles. The simplicity of the 6502 architecture—featuring a 16-bit address bus and an 8-bit data bus—made it accessible for programmers, fostering a generation of game developers who learned to squeeze every ounce of performance from limited hardware.

Before delving into game development, it's crucial to grasp the 6502 architecture. The processor has a rich instruction set, including load/store operations, arithmetic, and branching. Here's a quick look at its key components:

  • Registers: The 6502 has three main registers—Accumulator (A), Index Register X, and Index Register Y. These registers are essential for performing operations and managing data.
  • Memory Access: The 6502 can address up to 64KB of memory, with specific addressing modes like zero-page and absolute addressing that optimize performance.
  • Instruction Set: The instruction set includes over 50 commands, including arithmetic operations, control flow, and bit manipulation.
💡 Key Point: Familiarize yourself with the various addressing modes of the 6502, as they significantly impact how efficiently you can manipulate data.

For those new to 6502 assembly, getting started can be daunting. Here’s a quick-start guide:

  1. Set up an emulator like FCEUX or Mesen to test your code.
  2. Start with simple programs, such as displaying text or manipulating numbers.
  3. Utilize online resources and communities, such as the 6502 Assembly Language Programming site, for tutorials and examples.
  4. Practice writing small routines that interact with the hardware, like reading from the controller or manipulating graphics.

Graphics programming in 6502 assembly is a critical aspect of game development. The NES, for example, uses a Picture Processing Unit (PPU) to handle graphics. Here are the steps to get started:


; Set up the PPU to display a simple sprite
LDA #$00        ; Load the sprite index
STA $2002       ; Clear the sprite overflow
LDA #$01        ; Load sprite data
STA $2000       ; Set sprite address

Understanding how to manipulate sprite memory and render them on screen is fundamental. The PPU allows for complex graphics manipulation, including background layers and sprite collision detection.

⚠️ Common Pitfall: Forgetting to clear the sprite overflow flag can lead to unexpected behavior in your game graphics.

Game development isn’t just about visuals; it also involves user interaction. The 6502 allows you to read input from game controllers efficiently. Here's how you can handle input:


; Read game controller input
LDA $4016        ; Read controller 1
AND #$01         ; Mask for button A
BEQ no_button     ; Branch if button A is not pressed
; Handle button A pressed
no_button:

This snippet reads the input from the first controller and checks if the "A" button is pressed. You can expand this to handle multiple buttons and even multiple controllers.

While security is often a concern in high-level programming languages, it's also crucial in assembly language. Here are some security best practices:

  • Input Validation: Always validate inputs from controllers or other devices to prevent unexpected behavior.
  • Memory Management: Be cautious with memory access to prevent buffer overflows and unauthorized data access.
⚠️ Warning: Improper handling of memory can lead to crashes or unpredictable behavior in your game.

Once you have a grasp on the basics, you can implement advanced techniques to enhance your game's mechanics:

  • State Machines: Use state machines to manage different game states (e.g., menu, gameplay, pause).
  • Collision Detection: Implement efficient algorithms for detecting collisions between sprites.
  • Game Loops: Structure your game loop to ensure smooth rendering and input handling.

; Simple game loop structure
game_loop:
    JSR handle_input   ; Read input
    JSR update_game    ; Update game state
    JSR render_graphics ; Render graphics
    JMP game_loop      ; Repeat

1. What is the best emulator for testing 6502 code?

Emulators like FCEUX and Mesen are excellent choices due to their robust debugging features and support for various platforms.

2. How do I optimize my 6502 code for performance?

Utilize zero-page addressing, minimize branching, and structure loops efficiently to enhance performance.

3. Can I use high-level language features in 6502 assembly?

While 6502 assembly is low-level, you can create macros and utilize libraries to abstract some complexity.

4. How can I manage game state effectively?

Implement state machines to manage different game states, making the code more structured and easier to maintain.

5. Are there resources for learning 6502 assembly programming?

Yes, websites like 6502asm.com and various YouTube channels offer tutorials and examples to help you get started.

Utilizing the 6502 assembly language for game development is a rewarding challenge that allows developers to create engaging experiences with limited resources. By understanding the architecture, optimizing performance, and implementing best practices, you can harness the full potential of the 6502. As retro gaming continues to grow in popularity, mastering Asm6502 will enable you to contribute to this vibrant community and create games that resonate with both nostalgic and new players alike.

PRODUCTION-READY SNIPPET

When developing in 6502 assembly, you may encounter various errors. Below are some common error codes and their explanations:

Error Code Description Solution
BRK Break instruction encountered Check for unintentional break instructions in your code.
ORA Logical OR operation failed Ensure the operands are valid and check for proper addressing modes.
IRQ Interrupt request failure Review your interrupt handling code for errors.
PERFORMANCE BENCHMARK

Performance optimization is crucial in 6502 assembly programming, especially for games that require smooth graphics and fast response times. Here are some techniques to consider:

  • Use Zero-Page Addressing: Accessing data in the zero page (addresses $00 to $FF) is faster than accessing data in the full memory space.
  • Minimize Branching: Excessive branching can slow down your code. Try to structure your code to minimize branches and keep critical loops tight.
  • Optimize Loops: Keep loops as short as possible and try to unroll them when feasible for speed.
Best Practice: Use profiling tools available in emulators to identify bottlenecks in your code.
Open Full Snippet Page ↗
SNP-2025-0108 Idris code examples Idris programming 2026-06-10

How Can You Leverage Dependent Types in Idris for Safer and More Expressive Code?

THE PROBLEM

Idris is a unique programming language that combines functional programming with dependent types, offering developers a powerful toolset for building robust and type-safe applications. This question—how to effectively leverage dependent types in Idris—matters significantly in today's software development landscape, where reliability and correctness are paramount. Dependent types allow types to be predicated on values, enabling developers to encode more invariants and constraints directly in their type system. This post will delve into the intricacies of dependent types in Idris, providing practical guidance, code examples, and tips for best practices.

The concept of dependent types has its roots in type theory, which dates back to the work of logicians like Bertrand Russell and Alonzo Church. The emergence of functional programming languages such as Agda and Coq brought dependent types into practical programming. Idris, created by Edwin Brady, aimed to make dependent types more accessible for practical programming tasks while retaining the advantages of functional programming. Understanding this historical context helps clarify why Idris is structured the way it is and how its type system can be a game-changer for developers.

Dependent types allow types to depend on values. This means that you can create types that are not just static but can include dynamic information. For instance, you can define a type that represents lists of a specific length. This capability leads to more expressive types and can eliminate many runtime errors at compile time. Here’s a simple example:

data Vec : Nat -> Type -> Type where
  Vnil  : Vec 0 a
  (::)  : a -> Vec n a -> Vec (n + 1) a

In this code, the type Vec represents a vector of length n containing elements of type a. This simple structure illustrates how dependent types can enforce constraints that would otherwise need runtime checks.

Using dependent types in Idris can significantly improve your code's safety and expressiveness. To implement dependent types, you'll often start by defining your data structures in a way that reflects your domain's requirements. Here’s how you might define a simple function that operates on our Vec type:

head : Vec (n + 1) a -> a
head (x :: xs) = x

This function safely retrieves the first element of a non-empty vector, ensuring at compile time that the vector is indeed non-empty.

Type Safety: Dependent types help catch errors at compile time, reducing potential runtime exceptions.
Expressiveness: You can represent more complex data structures and invariants directly in the type system.

By utilizing dependent types, developers can express invariants that the compiler can check, which leads to safer code. For instance, you can define a type representing sorted lists, which can be enforced at compile-time, thus preventing inadvertent errors.

💡 Start Simple: Begin with simple dependent types and gradually introduce complexity as needed.
💡 Use Type-Level Functions: They can help to manipulate types effectively.

Best practices include documenting your types clearly, using type-level functions to abstract common patterns, and leveraging Idris’s type inference to reduce boilerplate. Here’s an example of a type-level function that calculates the length of a vector:

length : Vec n a -> Nat
length Vnil = 0
length (x :: xs) = 1 + length xs
⚠️ Ensure Type Correctness: Type errors can lead to unexpected behaviors. Always validate types thoroughly.

Security is paramount in software development. By leveraging dependent types, you can create more secure applications, as many common vulnerabilities arise from type errors. For instance, ensuring that functions receive inputs of the correct type can prevent buffer overflows and related security issues.

When comparing Idris to other languages with type systems, it's essential to consider the expressiveness of dependent types. For instance, languages like Haskell offer a strong type system but lack the same level of expressiveness as Idris's dependent types.

Language Dependent Types Strong Typing Type Inference
Idris Yes Yes Yes
Haskell No Yes Yes
Coq Yes Yes No

This comparison highlights the unique position of Idris in the landscape of programming languages, particularly for developers who value type safety and expressiveness.

1. What are dependent types?

Dependent types are types that depend on values. They allow for more expressive type systems where types can encode properties of data that can be checked at compile time.

2. How can I start using Idris?

To start using Idris, download and install it from the official Idris website. Familiarize yourself with its syntax and core concepts by going through the official documentation and tutorials.

3. What are some common use cases for dependent types?

Common use cases include creating safe APIs, implementing complex data structures, and ensuring correctness in mathematical proofs through code.

4. Can dependent types be used in large-scale applications?

Yes, many large-scale applications can benefit from the safety and expressiveness of dependent types, although careful planning is necessary to manage complexity.

5. What are some limitations of dependent types?

Some limitations include the steep learning curve and potential for increased complexity in type definitions, which can complicate code readability and maintainability.

Leveraging dependent types in Idris offers a compelling way to enhance the safety and expressiveness of your code. By understanding the core concepts, avoiding common pitfalls, and adhering to best practices, developers can significantly reduce runtime errors and create more robust applications. As you explore Idris and its dependent type system, remember that the goal is to find the right balance between expressiveness and simplicity. With the growing interest in type-safe programming, mastering dependent types may well be a valuable asset in your programming toolkit.

COMMON PITFALLS & GOTCHAS
⚠️
Beware of complexity! While dependent types add power, they can also increase the complexity of type definitions, making code harder to understand.

One common pitfall is over-engineering your types. While it’s tempting to define types for every possible constraint, this can lead to convoluted and unreadable code. Striking a balance between expressiveness and simplicity is key.

PERFORMANCE BENCHMARK

When working with dependent types, performance can occasionally be a concern, particularly because the type-checking process may introduce overhead. However, the actual runtime performance of Idris programs is generally efficient, as the dependent types will be erased during compilation, leaving behind optimized code. It's important to profile your application and identify any bottlenecks, particularly when using complex types or extensive type-level computations.

Open Full Snippet Page ↗
SNP-2025-0320 Dot code examples Dot programming 2026-06-10

How Can You Leverage Dot Programming to Enhance Data Visualization in Modern Applications?

THE PROBLEM
In the realm of software development, data visualization has emerged as a critical component for interpreting and presenting complex information. With the proliferation of data across various industries, the ability to visualize this data effectively can empower businesses to make informed decisions swiftly. Dot programming, particularly in the context of the Graphviz tool, provides powerful capabilities for creating visual representations of data structures and relationships. This post will explore how Dot programming can be utilized to enhance data visualization, addressing practical implementations, advanced techniques, common pitfalls, and best practices. Dot is a graph description language that is part of the Graphviz software suite. It allows developers to describe the structure of a graph in a plain text format, which can then be processed to produce graphical representations. The simplicity of Dot makes it accessible for beginners while still providing advanced features for experienced developers. Dot is widely used in various fields, including network visualization, workflow diagrams, and even software architecture representation.
💡 Key Features of Dot Programming:
  • Easy-to-read syntax for defining nodes and edges.
  • Supports various output formats (PNG, PDF, SVG).
  • Integrates easily with programming languages like Python, Java, and C++.
The fundamental building blocks of a Dot file are nodes and edges. Nodes represent entities, while edges indicate relationships between these entities. Here’s a basic structure of a Dot file:

digraph G {
    A -> B;
    B -> C;
    A -> C;
}
In this example, we define a directed graph (`digraph`) with three nodes (A, B, and C) and directed edges between them. Understanding this simple structure is essential as it lays the groundwork for more complex visualizations. To create a graph, you’ll typically follow these steps: 1. **Install Graphviz**: Ensure you have Graphviz installed on your machine. You can download it from [Graphviz's official site](https://graphviz.gitlab.io/download/). 2. **Write a Dot File**: Create a text file named `example.dot` and add your graph description. 3. **Generate the Graph**: Use the command line to generate the graph image. For instance:

dot -Tpng example.dot -o example.png
This command converts the Dot file into a PNG image. Once you are familiar with the basics, you can explore advanced techniques, such as: - **Subgraphs**: Grouping nodes for clarity and organization in larger graphs. For example:

digraph G {
    subgraph cluster_0 {
        A;
        B;
        label = "Cluster 0";
    }
    C;
}
- **Customizing Node Styles**: You can define shapes, colors, and styles for nodes and edges to enhance readability and aesthetics.

digraph G {
    node [shape=circle, color=lightblue];
    A -> B [color=red, style=dashed];
}
When using Dot in applications, especially web-based ones, security is paramount. Here are some security best practices: - **Input Validation**: Always validate and sanitize inputs that will be converted into Dot files to prevent injection attacks. - **Limit Output Formats**: If your application allows users to generate graphs, consider restricting the output formats to reduce potential vulnerabilities. While Dot programming is powerful, there are other data visualization tools and libraries available. Here’s a quick comparison: | Feature | Dot Programming | D3.js | Chart.js | |------------------|----------------|----------------|----------------| | Ease of Use | Moderate | Advanced | Easy | | Output Formats | PNG, SVG, PDF | SVG, Canvas | Canvas, SVG | | Customization | Moderate | High | Moderate | | Interactivity | Low | High | Moderate | In summary, Dot programming excels at creating static graphs with a clear structure, while libraries like D3.js and Chart.js offer high interactivity and customization for dynamic web applications. If you’re new to Dot programming, follow these steps to get started quickly: 1. **Install Graphviz**: Download and install Graphviz on your system. 2. **Create a Simple Dot File**: Write a basic graph description. 3. **Generate the Graph**: Use the command line to produce a visual representation. 4. **Explore Advanced Features**: Gradually incorporate subgraphs, custom styles, and other advanced features as you become comfortable.

1. What is the primary use of Dot programming?

Dot programming is primarily used for creating visual representations of graphs, such as flowcharts, network topologies, and organizational charts.

2. Can Dot files be generated programmatically?

Yes, many programming languages, including Python and Java, provide libraries to create and manipulate Dot files programmatically.

3. What output formats does Dot support?

Dot supports various output formats, including PNG, SVG, PDF, and others, depending on the rendering options you select.

4. Are there any limitations to using Dot programming?

Yes, while Dot is powerful for static graphs, it lacks interactivity compared to JavaScript-based libraries like D3.js.

5. How can I debug my Dot files?

You can use online Graphviz tools for debugging or install local Graphviz software to validate your Dot syntax and visualize errors. Dot programming remains a valuable tool for data visualization, particularly for creating structured graphs that communicate complex relationships clearly. By leveraging the core concepts of Dot, applying advanced techniques, and adhering to best practices, developers can enhance their applications significantly. As data continues to grow in importance, mastering Dot programming will equip you with the skills necessary to present information in a visually impactful way. Whether you're a beginner or an experienced developer, embracing the capabilities of Dot programming can lead to more effective data storytelling and decision-making.
PRODUCTION-READY SNIPPET
While working with Dot programming, developers often encounter several common mistakes. Here are some pitfalls along with solutions: - **Syntax Errors**: Ensure that your Dot syntax is correct. Missing semicolons or incorrect brackets can lead to errors. Always validate your Dot files before generating graphs. - **Performance Issues**: For very large graphs, rendering can be slow. Consider simplifying your graph by reducing the number of nodes or edges or breaking it into multiple smaller graphs.
⚠️ Warning: Avoid overly complex graphs, as they can become unreadable and defeat the purpose of visualization.
REAL-WORLD USAGE EXAMPLE
Dot programming finds applications in numerous fields. Here are some examples: 1. **Network Topology Visualization**: Network engineers can represent network structures, showing how devices connect and communicate. 2. **Organizational Charts**: Businesses can visualize employee hierarchies and workflows, making it easier to understand organizational structures. 3. **Software Architecture Diagrams**: Developers can illustrate system components, their interactions, and dependencies, facilitating better design discussions.
✅ Practical Tip: Consider using online tools like Graphviz Online to experiment with Dot syntax without installing software.
PERFORMANCE BENCHMARK
To ensure that your Dot-generated graphs are both visually appealing and performant, consider the following optimization techniques: - **Use Clustering**: Group related nodes together to reduce the number of edges displayed and enhance clarity. - **Limit Edge Overlap**: Adjust edge routing options to minimize crossings, making your graph easier to understand. - **Graph Simplification**: Remove unnecessary nodes or edges that do not contribute to the understanding of the graph.
Open Full Snippet Page ↗

PAGE 1 OF 47 · 469 SNIPPETS INDEXED