
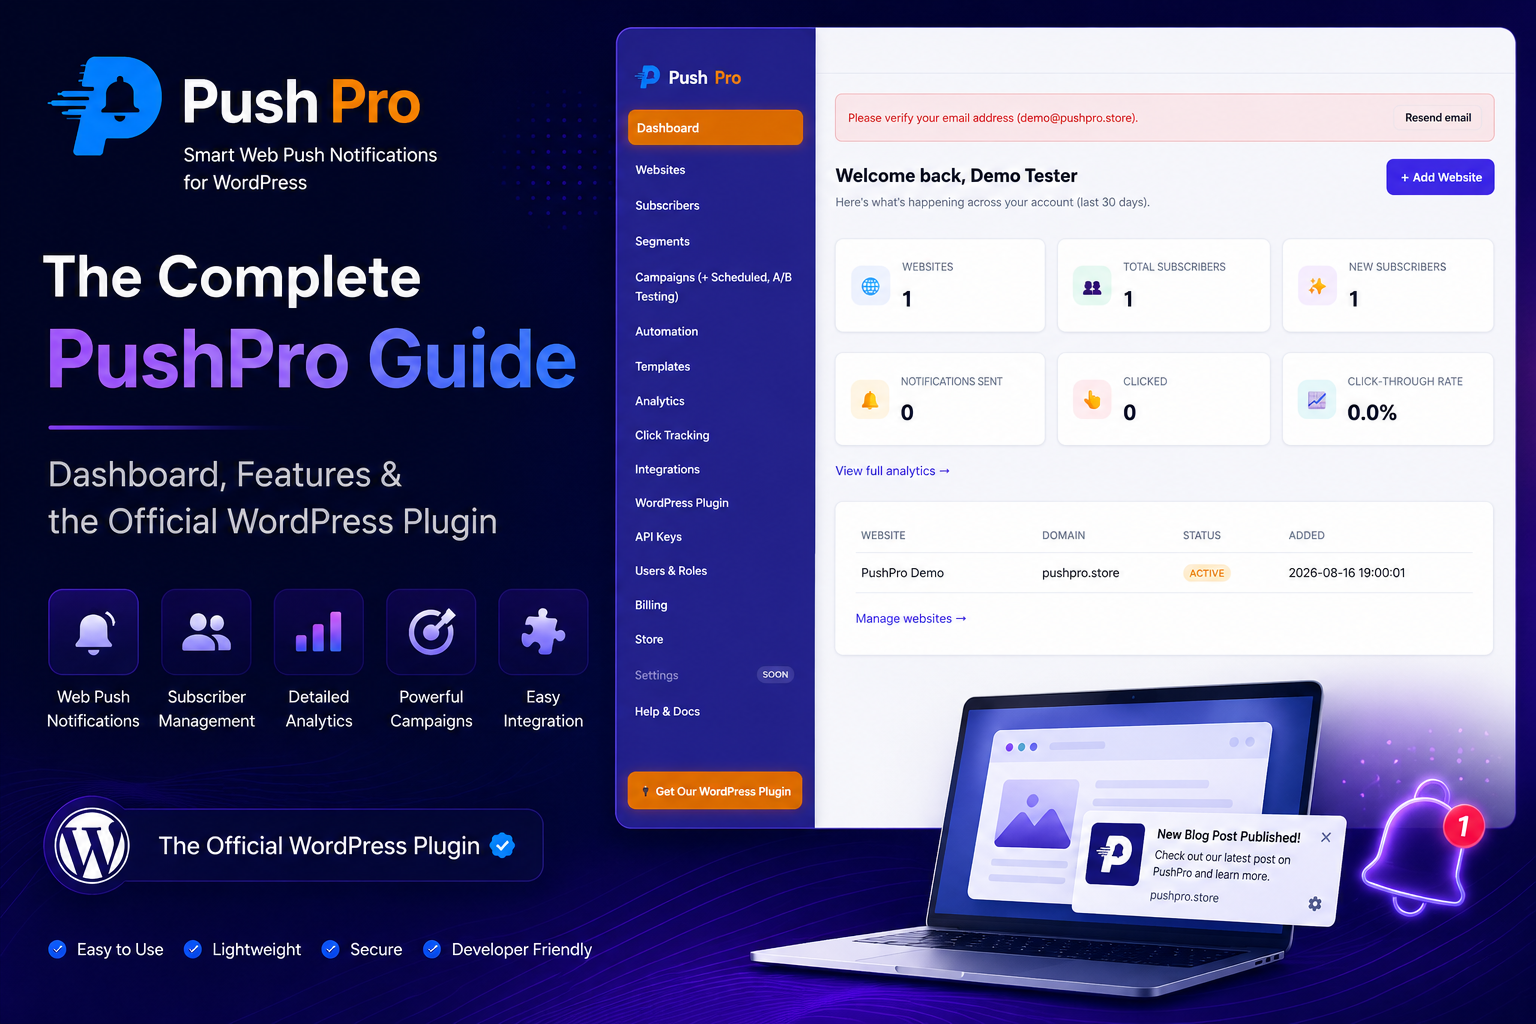
If you run a website, you already know the problem: your Instagram reach keeps shrinking, your open rates on email keep dropping, and most visitors who land on your site once never come back. PushPro is a web push notification platform built to fix exactly that — it lets you re-engage the people who already visited your site, directly in their browser, without an email address, an app install, or a third-party ad platform in the middle. This is the complete guide to what PushPro actually does, how the dashboard works end to end, and how the official WordPress plugin gets you from zero to your first subscriber in a few minutes.
Everything you’re about to see is a real, live screenshot of the actual product — not a mockup, not a design file, not a “coming soon” feature list. We walked through every screen ourselves, connected a real website, and even installed the official WordPress plugin from a genuine WordPress admin to capture this guide, so what you read here is exactly what you’ll see the moment you sign up.
Why web push, and why now
Every other channel a small business or blogger relies on has gotten harder. Social platforms show your posts to a shrinking fraction of your followers unless you pay to boost them. Email marketing still works, but getting someone to hand over their address — and then getting past the spam folder — is a real barrier. Meanwhile, browser push notifications sit in a strange sweet spot: a visitor grants permission with a single click, no personal information changes hands, and from that point on you can reach them instantly, on desktop or Android, whether or not they’re currently on your site.
PushPro is built specifically around that channel. It is not a notification button bolted onto a marketing suite — the entire product, from the database schema to the dashboard, is organized around collecting web push subscribers and sending them the right message at the right time. And because it’s architected as genuine multi-tenant SaaS rather than a single-site script, every subscriber, campaign, and analytics query is scoped server-side to your account specifically — there’s no dashboard view, API endpoint, or export anywhere in the product that could ever surface another customer’s data alongside yours.
None of that requires a developer to set up. If you can paste two lines of code — or, if your site runs WordPress, if you can search and install a plugin — you can be collecting real subscribers within a few minutes, which is exactly what the rest of this guide walks through.
Getting started: your dashboard at a glance
Sign-up is free and doesn’t require a credit card. Once you’re in, the Dashboard is the home screen — it’s a single-page summary of everything happening across every website connected to your account: how many websites you’ve connected, total and newly-added subscribers, notifications sent, clicks, and your click-through rate, all for the last 30 days by default. Below the KPI cards sits a quick list of your connected websites with their status, so you never have to dig through a menu just to confirm a site is active.
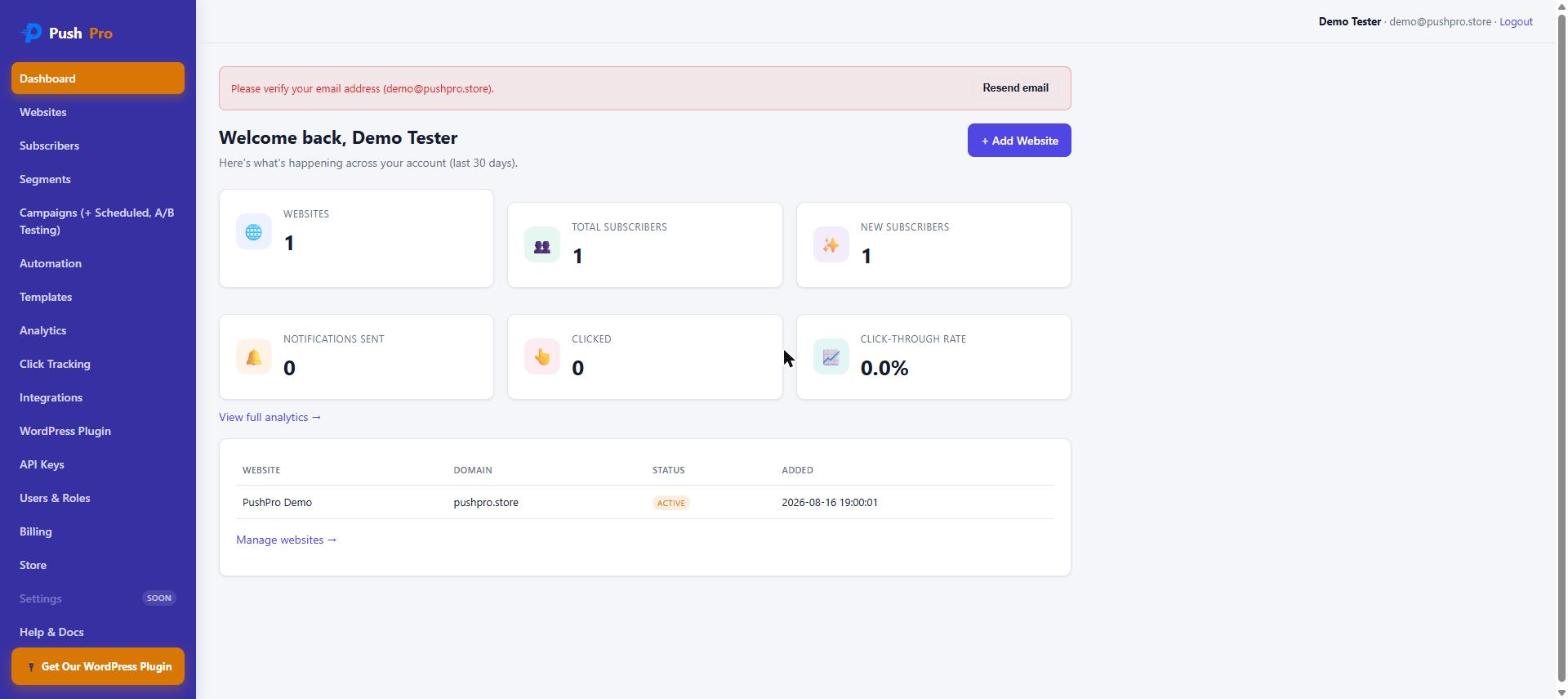
The left sidebar is where everything else lives: Websites, Subscribers, Segments, Campaigns, Automation, Templates, Analytics, Click Tracking, Integrations, the WordPress Plugin page, API Keys, Users & Roles, Billing, and Store. Nothing here is hidden behind an upsell wall to even see it — the Free plan gets you a real, working install with 1 website and 1,000 subscribers, so you can genuinely evaluate the product before paying anything.
Connecting your first website
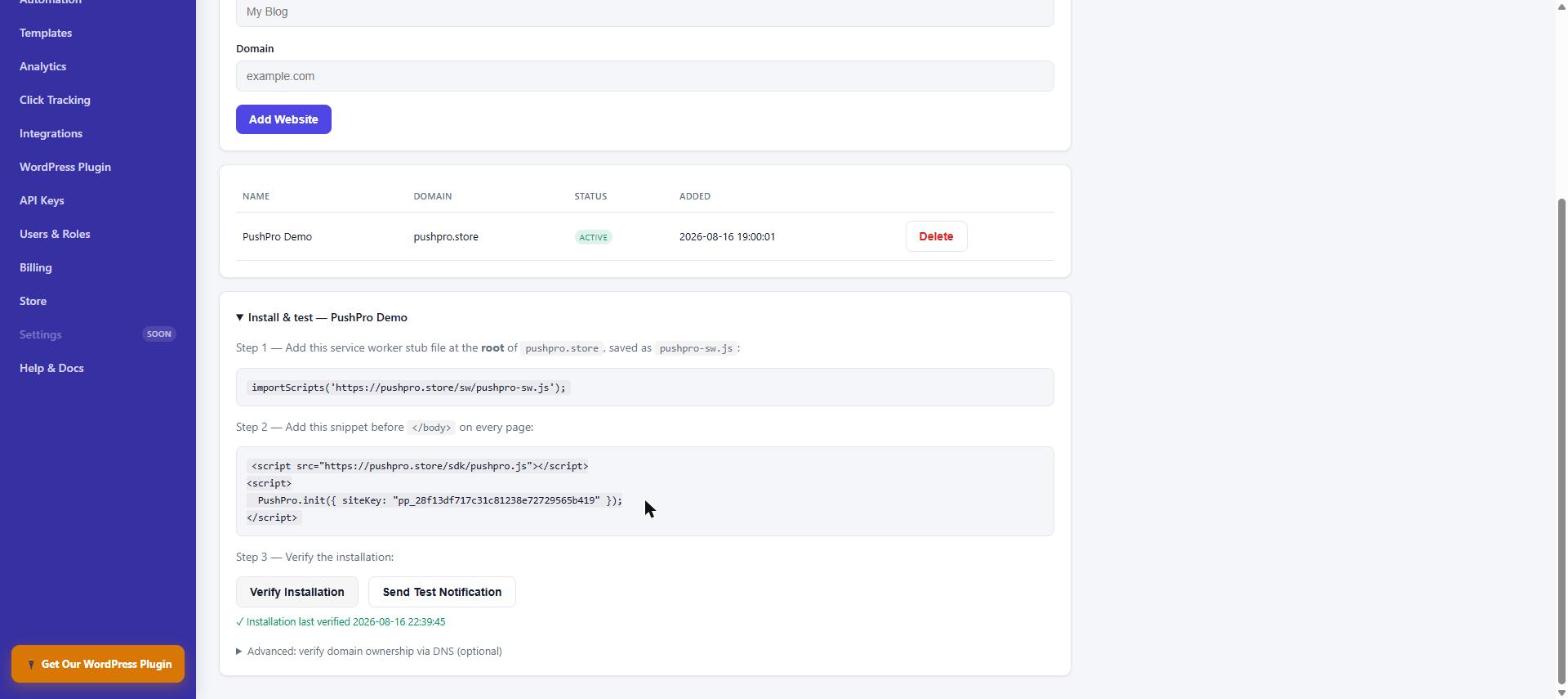
Everything starts on the Websites page. You give the website a name and its domain, click Add Website, and PushPro generates a unique site key for it immediately — no waiting, no approval step.
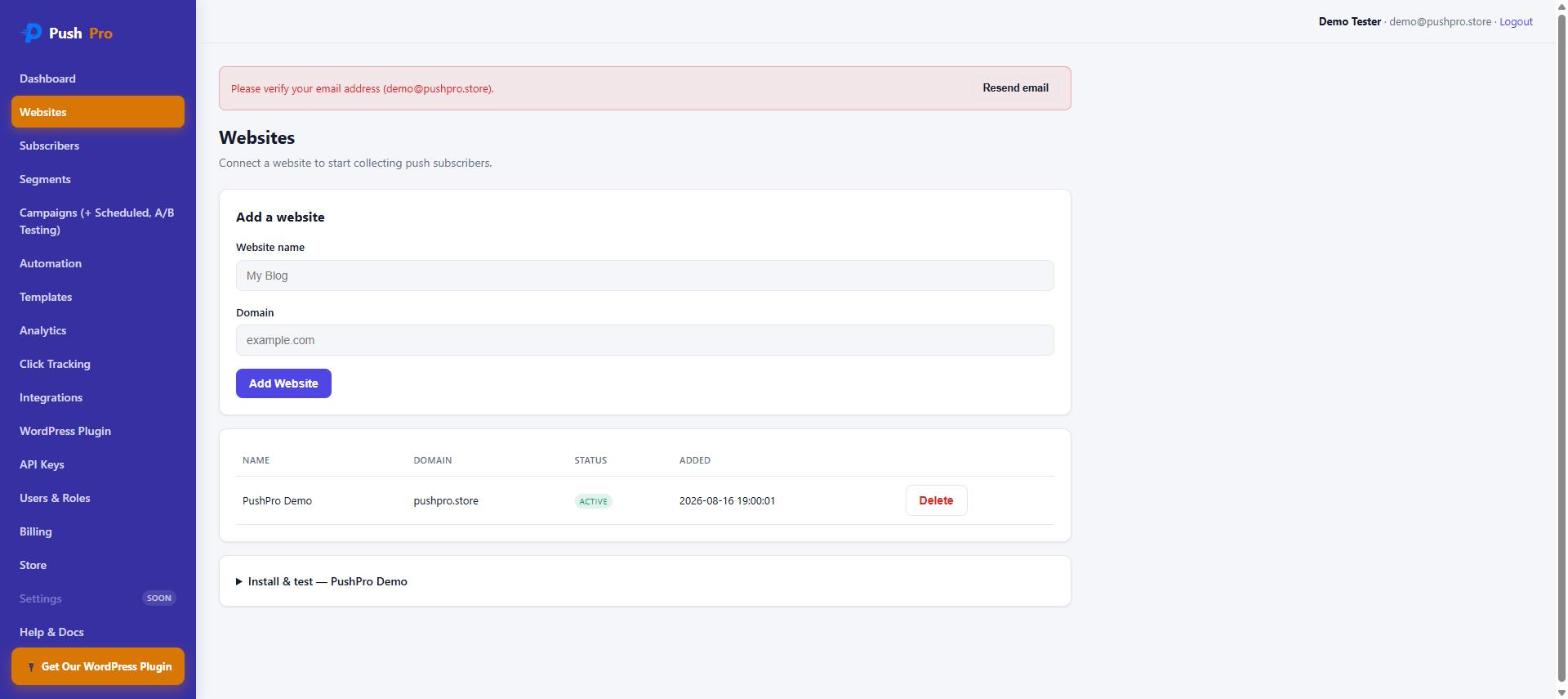
The real installation happens in the “Install & test” panel underneath, and it’s deliberately just two files:
- A one-line service worker stub, saved as
pushpro-sw.jsat the root of your domain. Browsers require push service workers to be same-origin, so this tiny file simply imports PushPro’s real push-handling logic from PushPro’s own servers. - An SDK snippet, added right before your closing
</body>tag, that loads PushPro’s script and initializes it with your site’s unique site key.
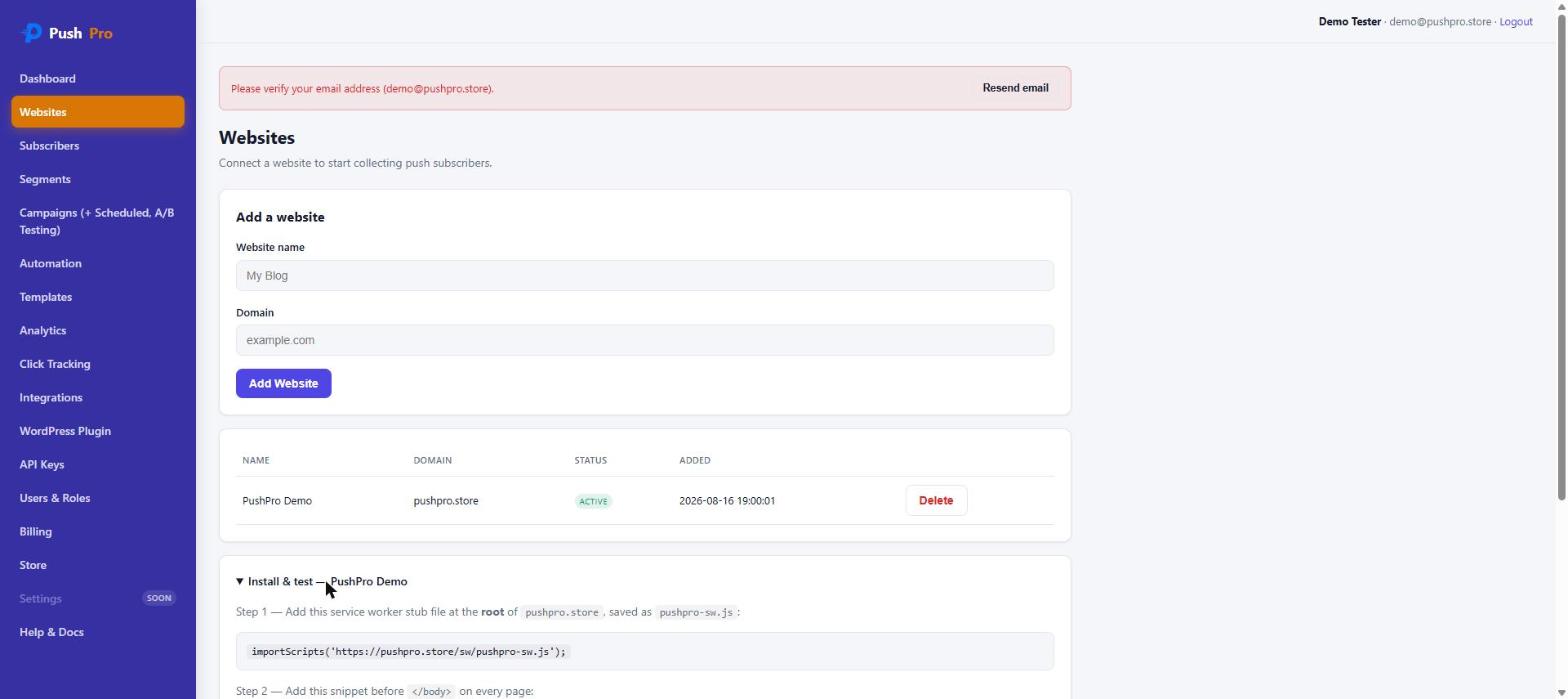
Because the stub file only imports PushPro’s real logic rather than containing it, your integration never goes stale — when PushPro improves how notifications are delivered or handled, every connected site benefits automatically, with nothing for you to re-upload.
Once both files are live, the same panel gives you a real Verify Installation check — it performs an actual HTTPS and service-worker reachability check against your live site, not just a checklist you tick off yourself, and reports either a clean pass or exactly what’s still missing. A Send Test Notification button sits right next to it so you can confirm the whole pipeline, end to end, before you ever send a real campaign.
Subscribers: who’s actually listening
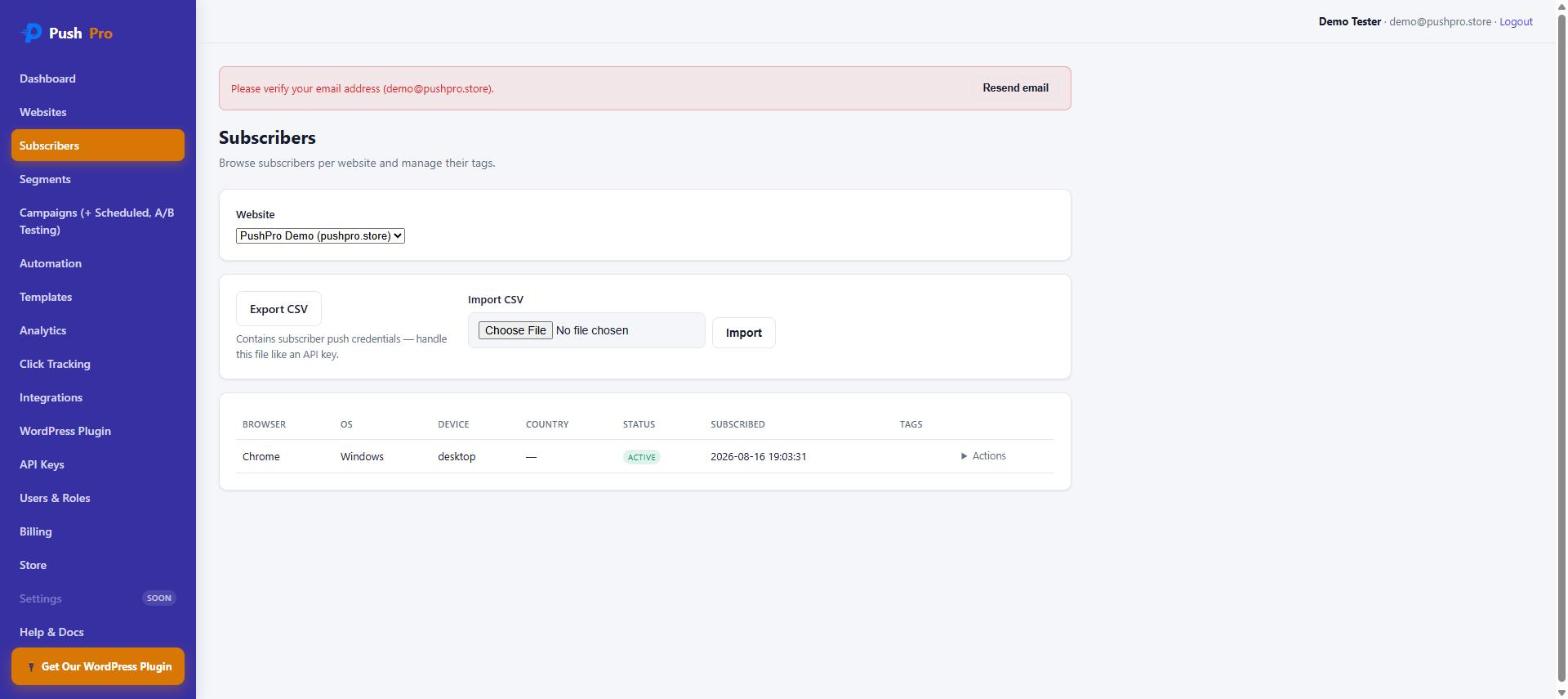
Every subscriber PushPro collects shows up on the Subscribers page, scoped per website, with their browser, OS, device type, country, status, and the date they subscribed — plus any tags you or your automations have applied to them. Only what’s genuinely needed to deliver a notification and understand your audience is collected: no email address, no phone number, nothing beyond the browser subscription endpoint the Web Push standard itself requires.
Two workflow tools live right at the top of this page: Export CSV pulls your full subscriber list (including their raw push credentials, so treat an exported file the same way you’d treat an API key), and Import CSV lets you restore a backup or migrate subscribers from elsewhere. Import is idempotent — re-importing the same file updates existing subscribers instead of duplicating them — and tag imports deliberately don’t fire your automations, so restoring a backup never accidentally re-triggers a welcome sequence to a thousand people at once.
Segments: targeting the right people
A segment is a named, reusable set of rules that Campaigns and Automation can target instead of blasting everyone. You can combine any number of rules — Browser, OS, Device Type, Country, Language, Tag, and Subscribed (days ago) — and every rule you add is ANDed together, so a segment can be as broad or as narrow as you need.
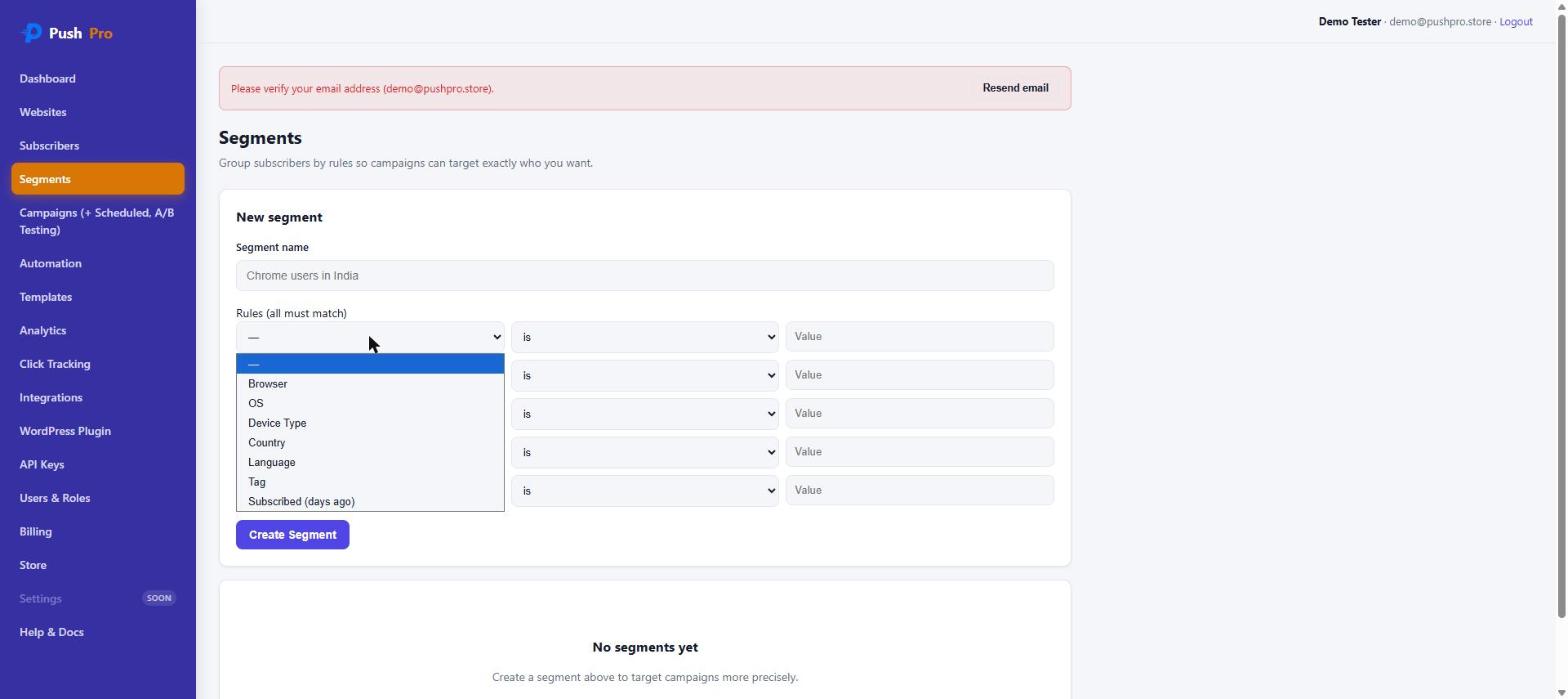
The detail that matters most here is timing: segment membership is calculated live, at the moment you actually send, not from a pre-computed list generated hours or days earlier. Someone who subscribed five minutes ago and matches your rules is included; someone who unsubscribed an hour ago is automatically excluded. You’re never sending to a stale snapshot of who your audience used to be.
Campaigns: draft, schedule, or send now
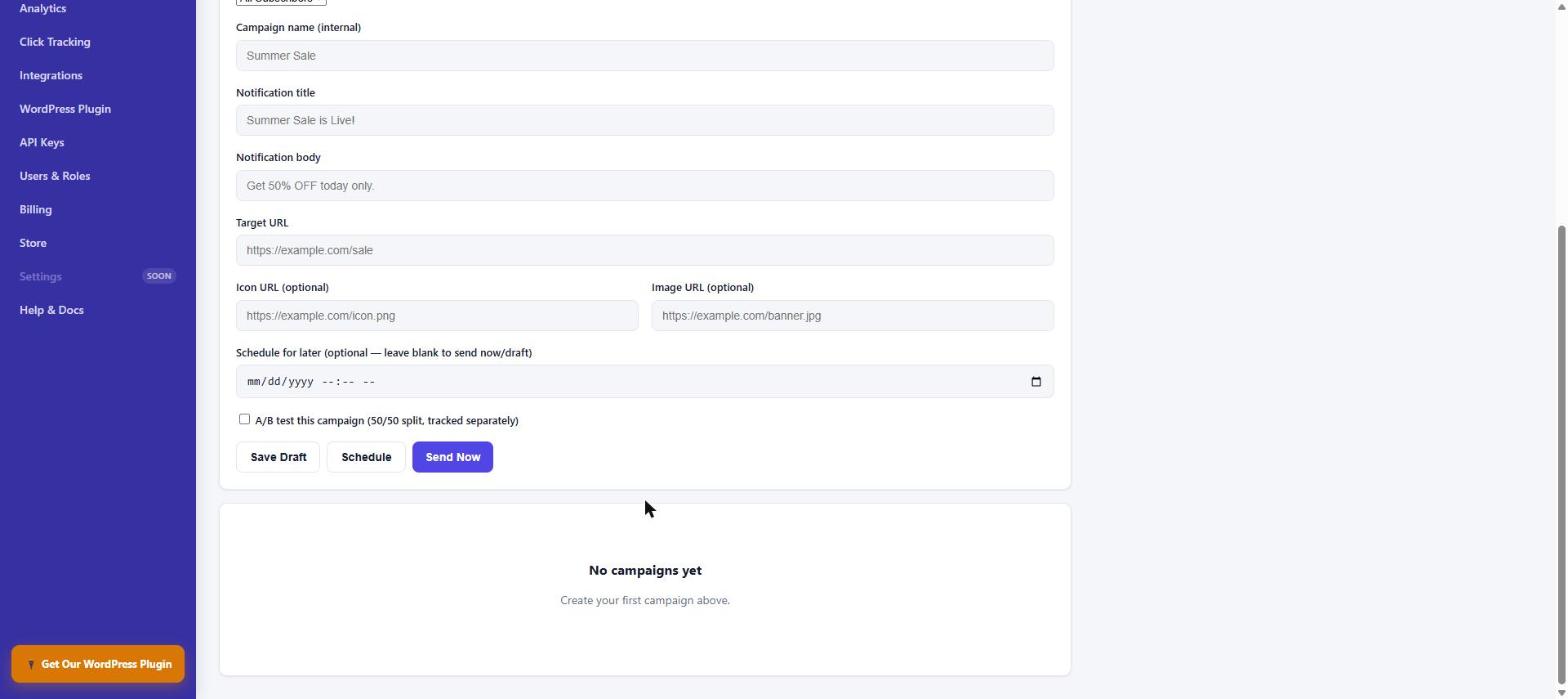
The Campaigns page is where notifications actually go out. You pick a website, pick an audience — All Subscribers or a specific segment — and fill in the notification’s title, body, target URL, and optional icon and image. Nothing here is guesswork about what the notification will look like once it’s built.
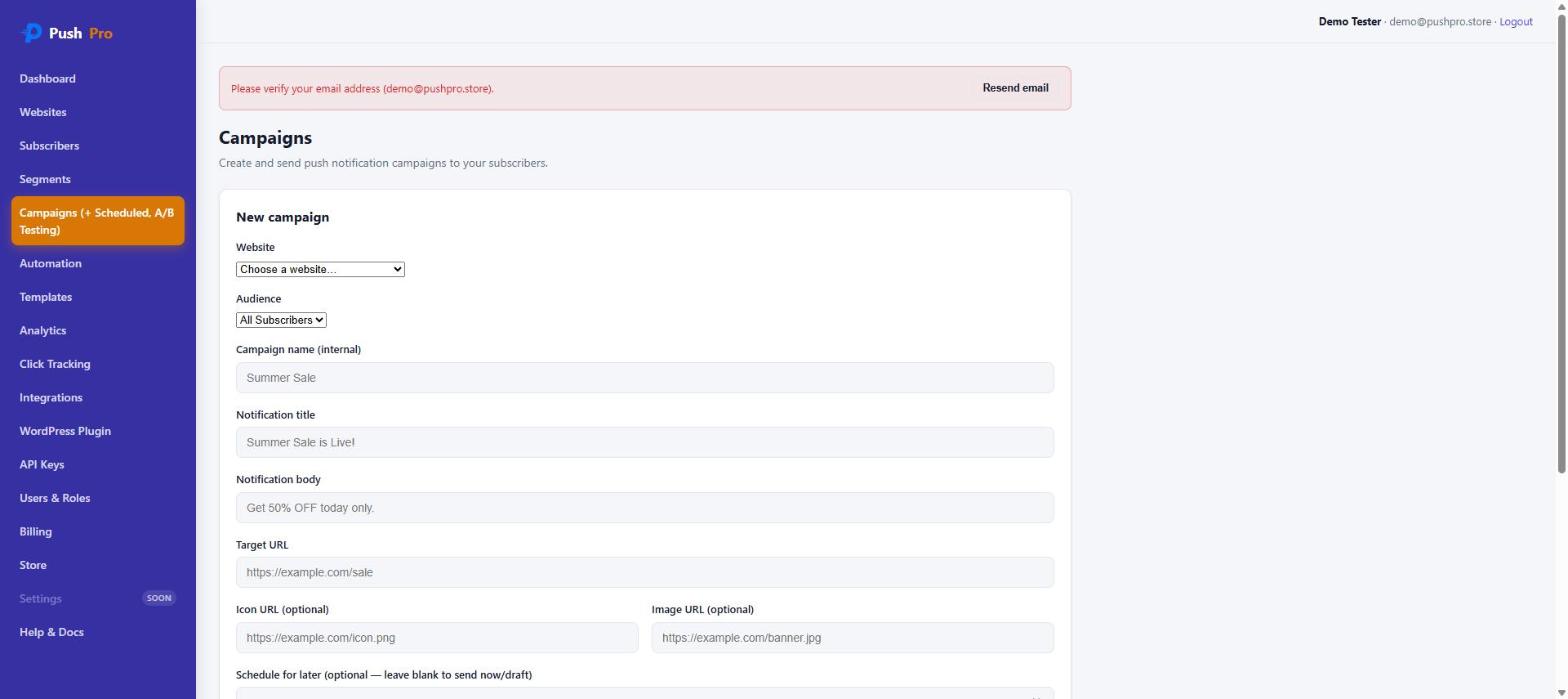
Every campaign can go three ways: Save Draft to come back to it later, Schedule it for a specific date and time, or Send Now to fire it immediately. There’s also a one-click A/B test checkbox that splits your audience 50/50 and tracks sent, click, and click-through-rate stats separately for each variant, so you can find out which title or message actually performs better instead of guessing.
Behind the scenes, delivery is idempotent and processed by a background worker with atomic job claiming — a given campaign-and-subscriber pair is only ever recorded and sent once, even if the worker restarts mid-run, and transient failures retry automatically with backoff before giving up. You don’t see any of this machinery from the dashboard; you just get notifications that reliably arrive once, not zero or twice.
Templates, Click Tracking, and Integrations
Three more sidebar pages round out the day-to-day workflow. Templates lets you save a campaign’s title, body, icon, and image as a reusable starting point, so a recurring announcement — a weekly digest, a restock alert, a “sale is live” push — doesn’t mean rebuilding the notification from scratch every time; you clone the template into a new campaign and just change the parts that are different this time.
Click Tracking is the page behind the click numbers you see in Analytics — every individual click event, tied back to the campaign and subscriber that generated it, so you can dig into raw delivery data rather than only trusting the summarized charts. Integrations is where webhook endpoints and other connected systems live, for teams who want PushPro’s subscriber and campaign events flowing into their own backend in real time rather than only checking the dashboard.
Automation: sequences that run themselves
Automation is where PushPro moves from “send one message” to “run a real sequence.” You choose a trigger — Subscriber Joined, Tag Added, Tag Removed, or a custom API Event you fire from your own backend — and then build a sequence out of steps: Send Notification, Wait, Add Tag, Remove Tag, Webhook, and End.
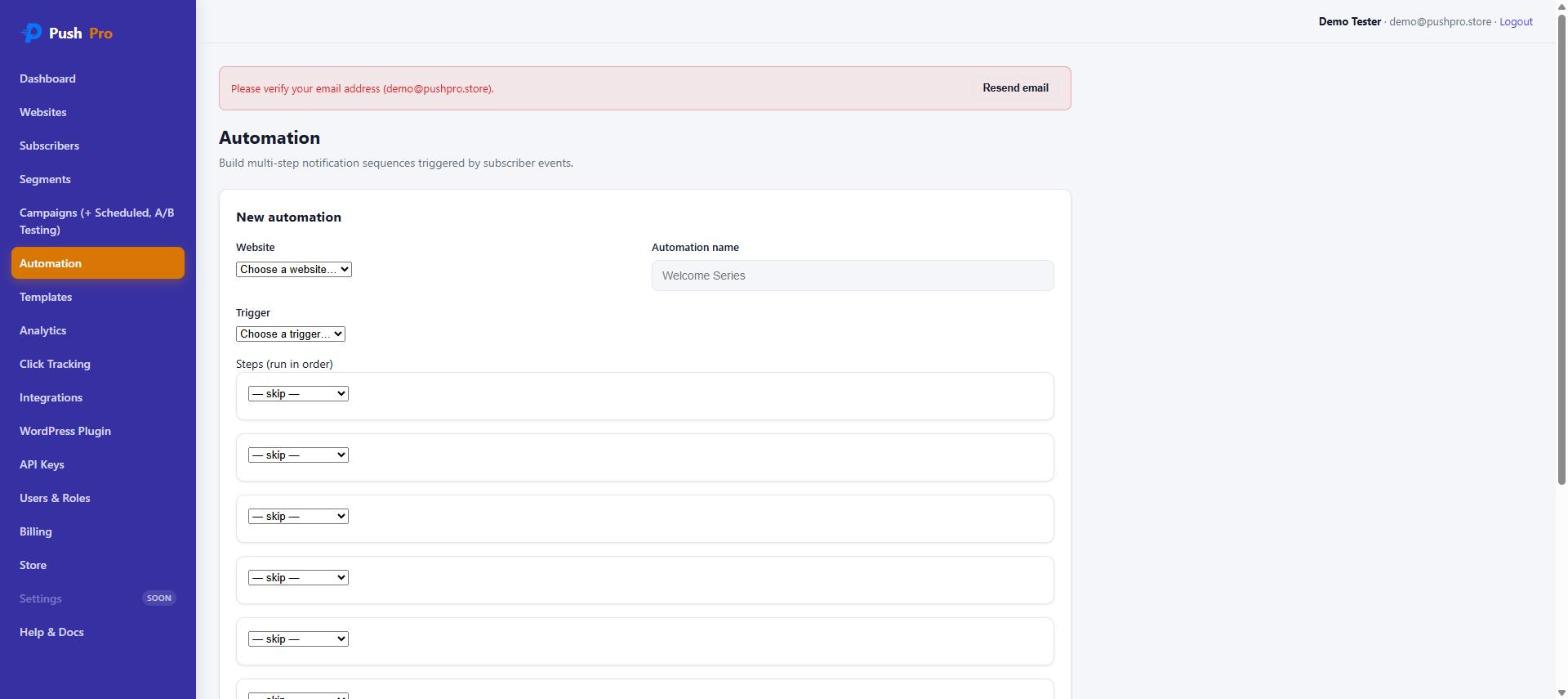
A typical welcome series might be: send a notification immediately on Subscriber Joined, wait 24 hours, send a second notification, and add a tag so a later campaign can identify anyone who completed the sequence. An online store might instead build an automation on a custom API Event fired from checkout — “cart abandoned” — that waits two hours, sends a reminder notification with a link straight back to the cart, and adds an “abandoned-cart-reminded” tag so that subscriber never gets the same reminder twice, even if they abandon a second cart before the tag is manually cleared.
Duplicate enrollment is prevented at the database level, and — importantly — if one subscriber’s step fails for some reason, it doesn’t halt the automation for anyone else running through it. A failed webhook call to your own server, for instance, only affects the one subscriber whose step failed; everyone else’s sequence keeps running exactly on schedule.
Analytics: knowing what actually worked
The Analytics page answers the question every campaign eventually raises: did it work? Total sent, clicks, click-through rate, failed, invalid/expired, and failure rate are all broken out over Today, Yesterday, Last 7 Days, Last 30 Days, This Month, or a fully custom date range, alongside new and total subscriber counts and a daily subscriber-growth chart.
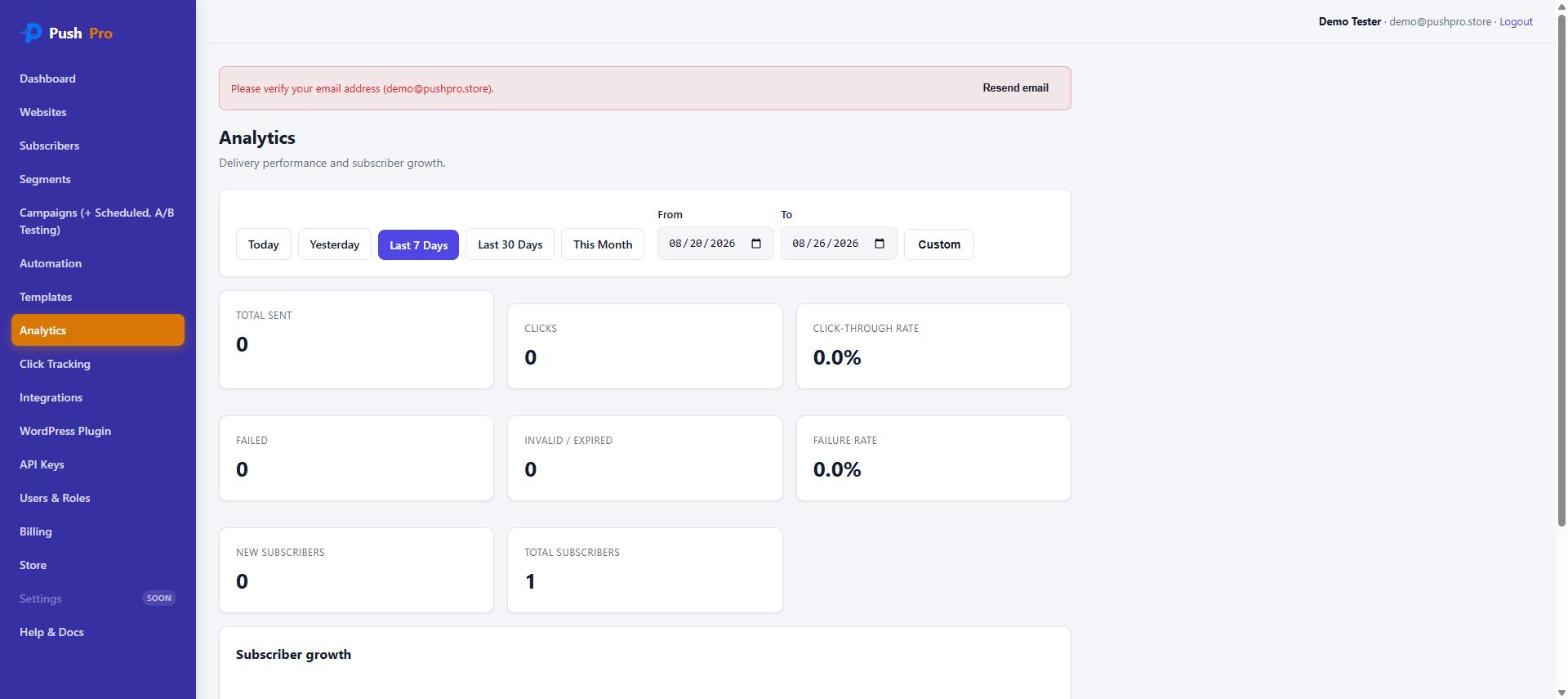
What makes the click numbers trustworthy is that every notification link is routed through a per-delivery tracking redirect before it reaches its real destination. That means a click is attributed to the exact campaign and the exact subscriber that generated it — not just a raw counter that could include bot traffic or be impossible to attribute back to a specific send.
API Keys: building on top of PushPro
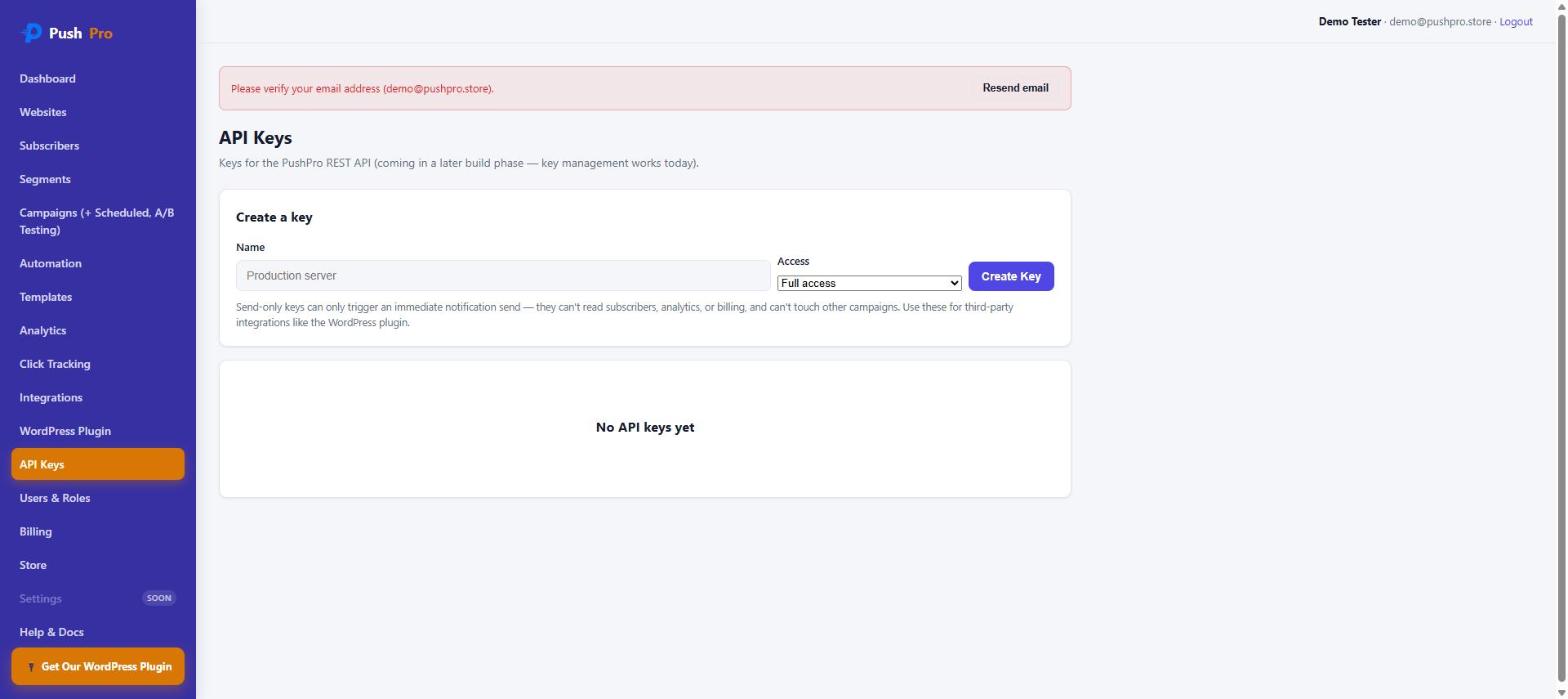
PushPro ships a full REST API — websites, campaigns (including send and schedule), read-only subscribers, analytics, and a custom-event endpoint that can kick off automations — plus HMAC-SHA256-signed webhooks so your own systems can react to subscriber and campaign events in real time. Every key is rate-limited per plan and hashed with SHA-256 before it’s stored, and the full value is only ever shown once, at creation.
The detail worth understanding is scope. When you create a key, you choose Full access or Send-only. A send-only key can trigger an immediate notification send and nothing else — it can’t read your subscriber list, your analytics, or your billing, and it can’t touch any other campaign. That’s specifically designed for third-party integrations like the WordPress plugin: if a website running the plugin were ever compromised, the attacker gets a key that can only fire a notification, not exfiltrate your subscriber data or rack up charges.
Team access and billing
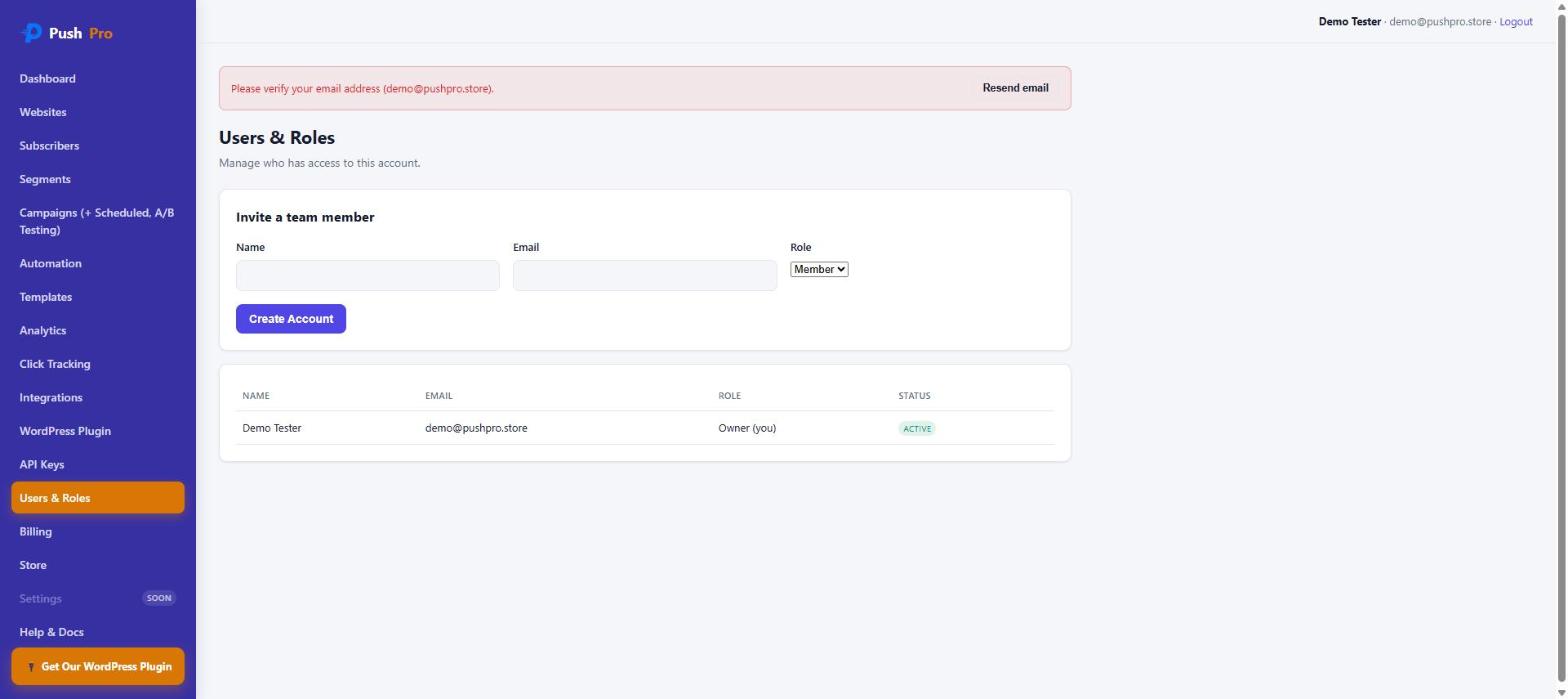
Users & Roles lets you invite teammates by name and email and assign them a role, with access enforced against your plan’s actual team-member limit rather than just displayed as a number you can ignore.
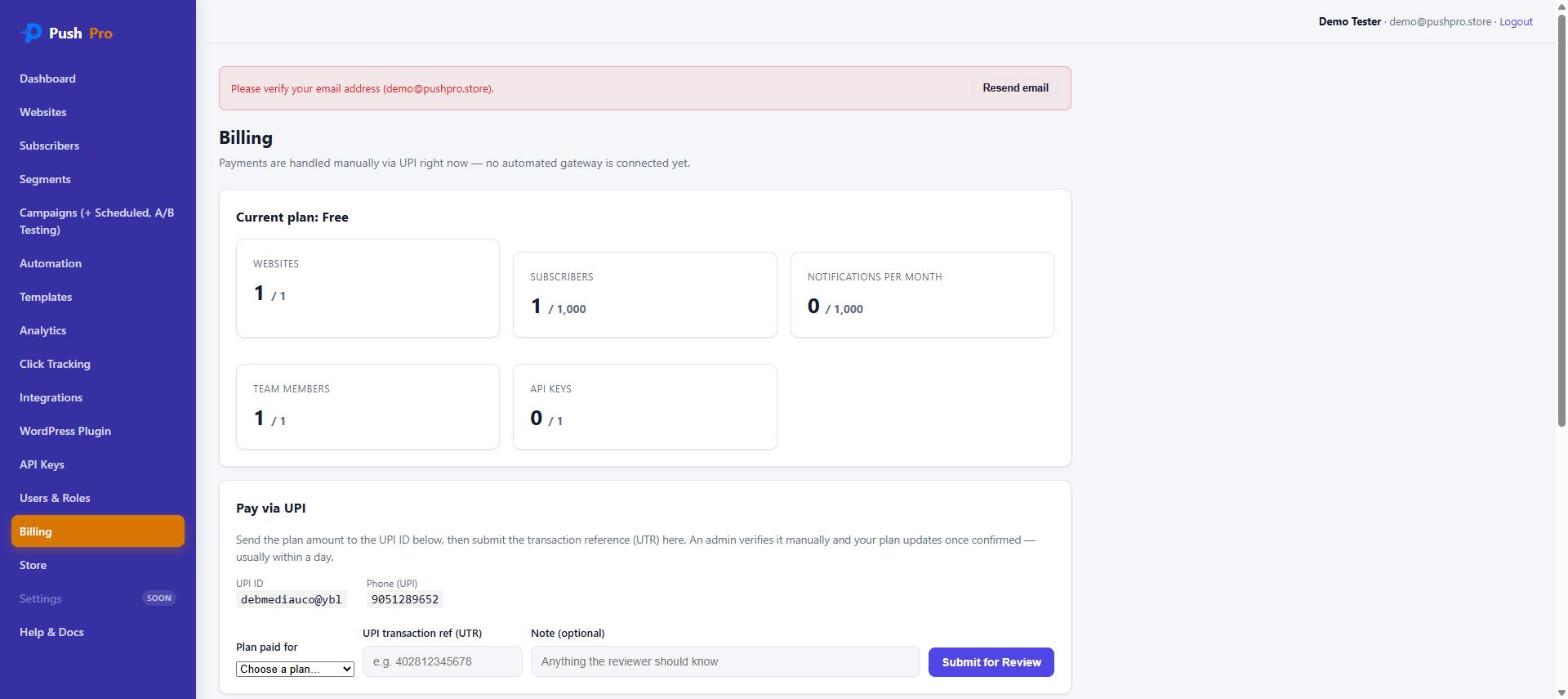
Billing shows your current plan against your actual usage — websites, subscribers, notifications sent this month, team members, and API keys — so you can see exactly how close you are to a limit before you hit it. Upgrades are handled manually rather than through an automated card-on-file gateway: you pay the plan amount via UPI, submit the transaction reference, and an admin verifies and activates the upgrade, usually within a day. Downgrading back to Free, by contrast, is instant and fully self-service.
The WordPress plugin: from search to your first automatic notification
If your site runs on WordPress, you don’t need to touch the two-file manual install at all. PushPro’s official plugin, Debmedia WebPush, is listed on the WordPress.org Plugin Directory, which means it installs the same way any other WordPress plugin does — no zip file, no FTP client, just a search inside your own WordPress admin.
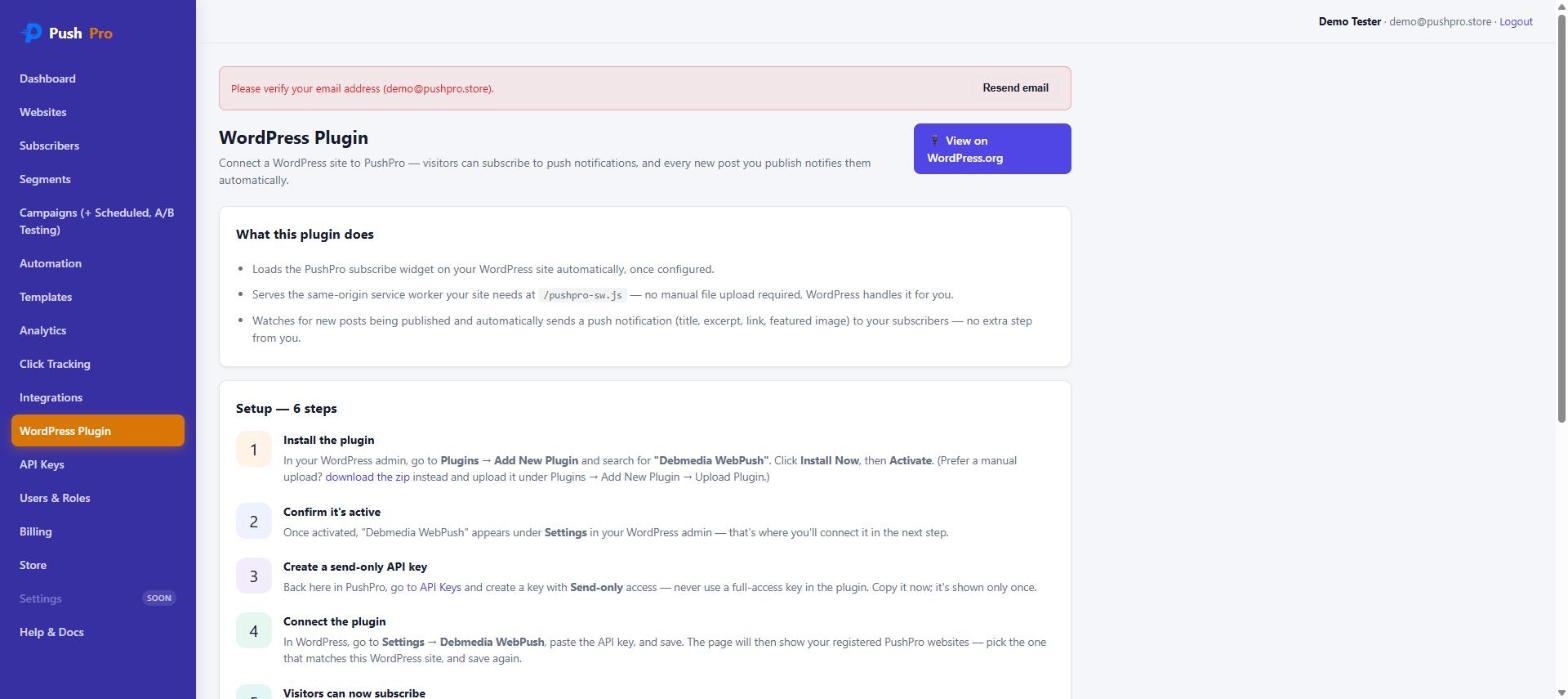
Inside PushPro itself, the WordPress Plugin page in the sidebar lays out the whole process as a numbered walkthrough, with a direct link to the plugin’s WordPress.org listing and a manual-zip fallback for anyone who prefers uploading a file directly.
Step 1 — Find it in your WordPress admin
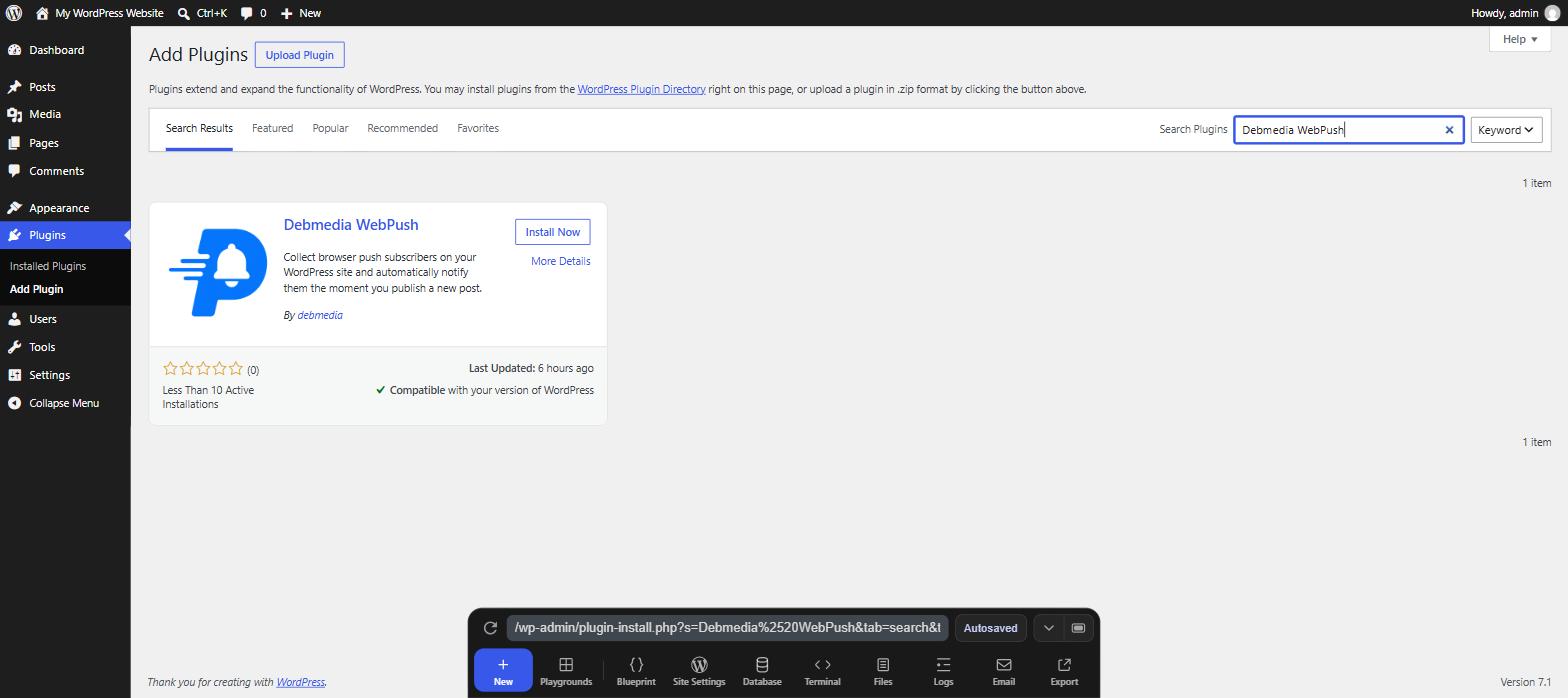
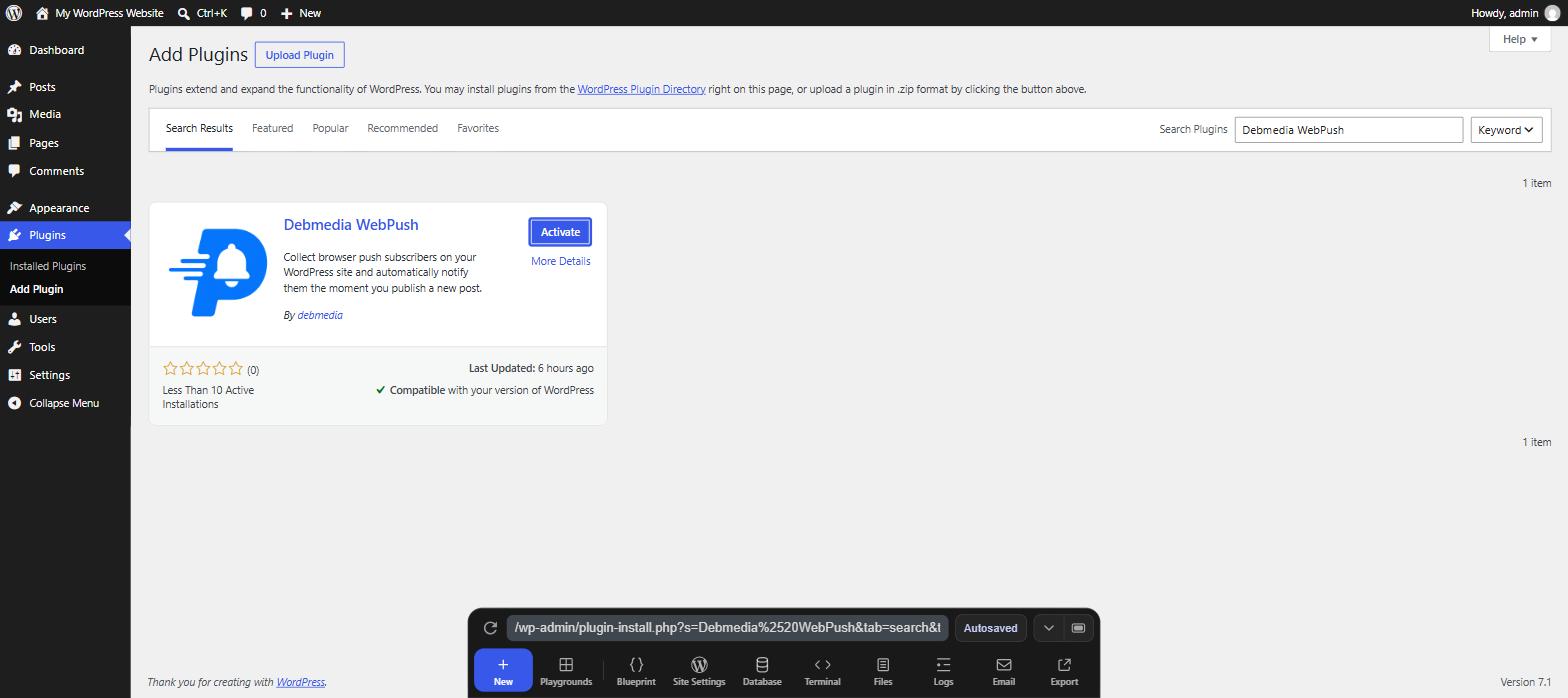
In your WordPress dashboard, go to Plugins → Add New Plugin and search for “Debmedia WebPush”. It comes up as the top result, with its icon, a short description, the author, and a live install count pulled straight from the WordPress.org directory.
Step 2 — Install, then activate
Click Install Now. WordPress downloads and installs it from the directory in a few seconds, and the button changes to Activate.
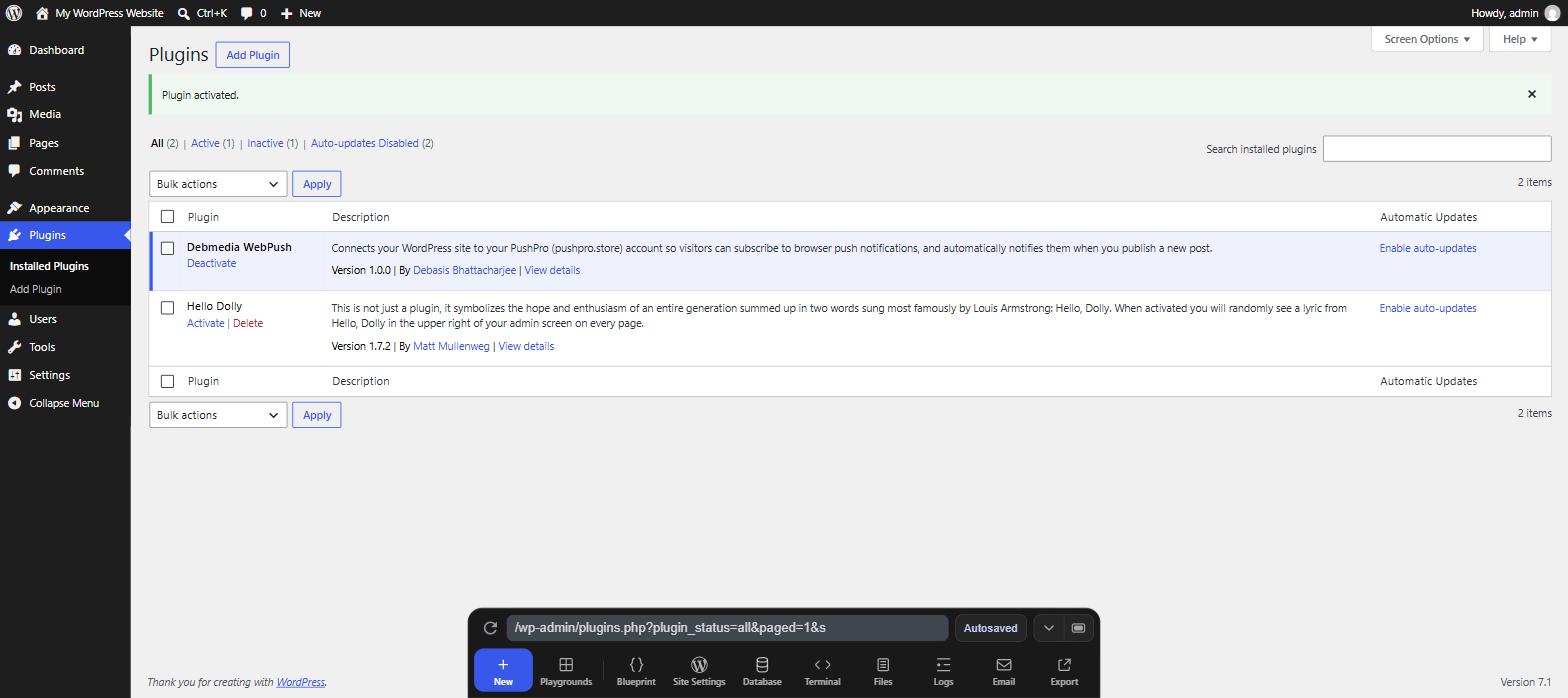
Click Activate, and WordPress confirms it immediately on the main Plugins list.
Step 3 — Create a send-only API key
Back in PushPro, go to API Keys and create a key with Send-only access, exactly as described above. Copy it immediately — it’s shown only once. This is the one credential the plugin will store in your WordPress database, and its limited scope is the whole point: it can trigger a send and nothing more.
Step 4 — Connect the plugin
Once activated, “Debmedia WebPush” appears under Settings in your WordPress admin. Open it, paste in your send-only API key, and save.
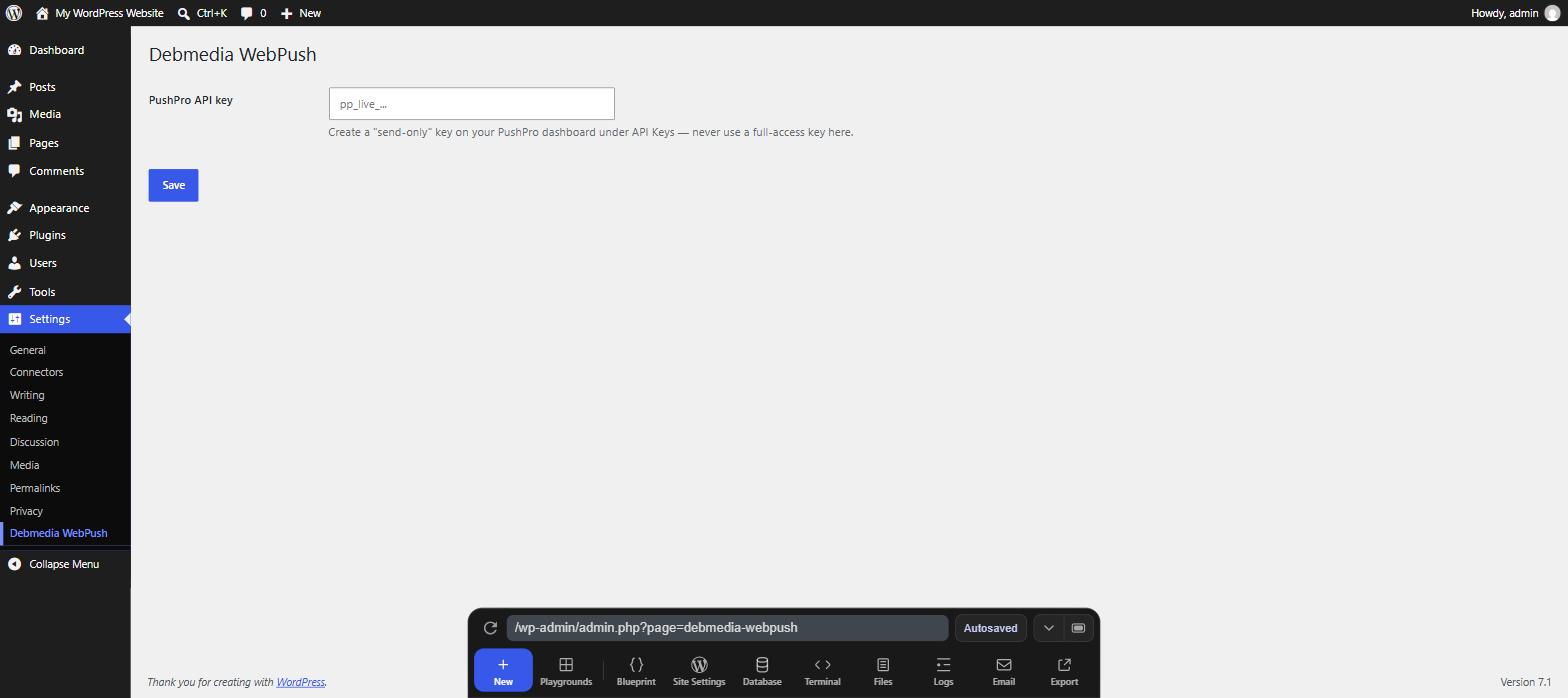
After saving, the page reloads and shows every website registered on your PushPro account, so you can pick the one that matches this WordPress install and save again. From that point on, two things happen automatically:
- The subscribe prompt goes live on your site — no extra template edits, no manual snippet, since the plugin itself registers the same-origin service worker and loads the SDK for you.
- Every time you publish a new post, the plugin sends its title, excerpt, permalink, and featured image straight to PushPro, which delivers it as a push notification to your subscribers within moments.
Editing and re-saving an already-published post never triggers a second notification — duplicate-send protection is handled automatically, using post meta the plugin sets the first time a notification goes out. And if you ever hit your plan’s send limit, the post still publishes normally; you’ll just see a WordPress admin notice explaining that the automatic notification wasn’t sent for that one post.
Prefer to run it yourself? The self-hosted option
Not everyone wants a hosted subscription, and PushPro doesn’t force that choice. The Store page offers a one-time, lifetime source-code license as an alternative to the monthly hosted plans, in three tiers: Startup for running PushPro single-tenant on your own server, Pro for unlocking multi-tenant mode so you can manage and bill multiple client sites, and Agency for a full dashboard rebrand — your own name and logo in place of PushPro, for running it as your own branded product.
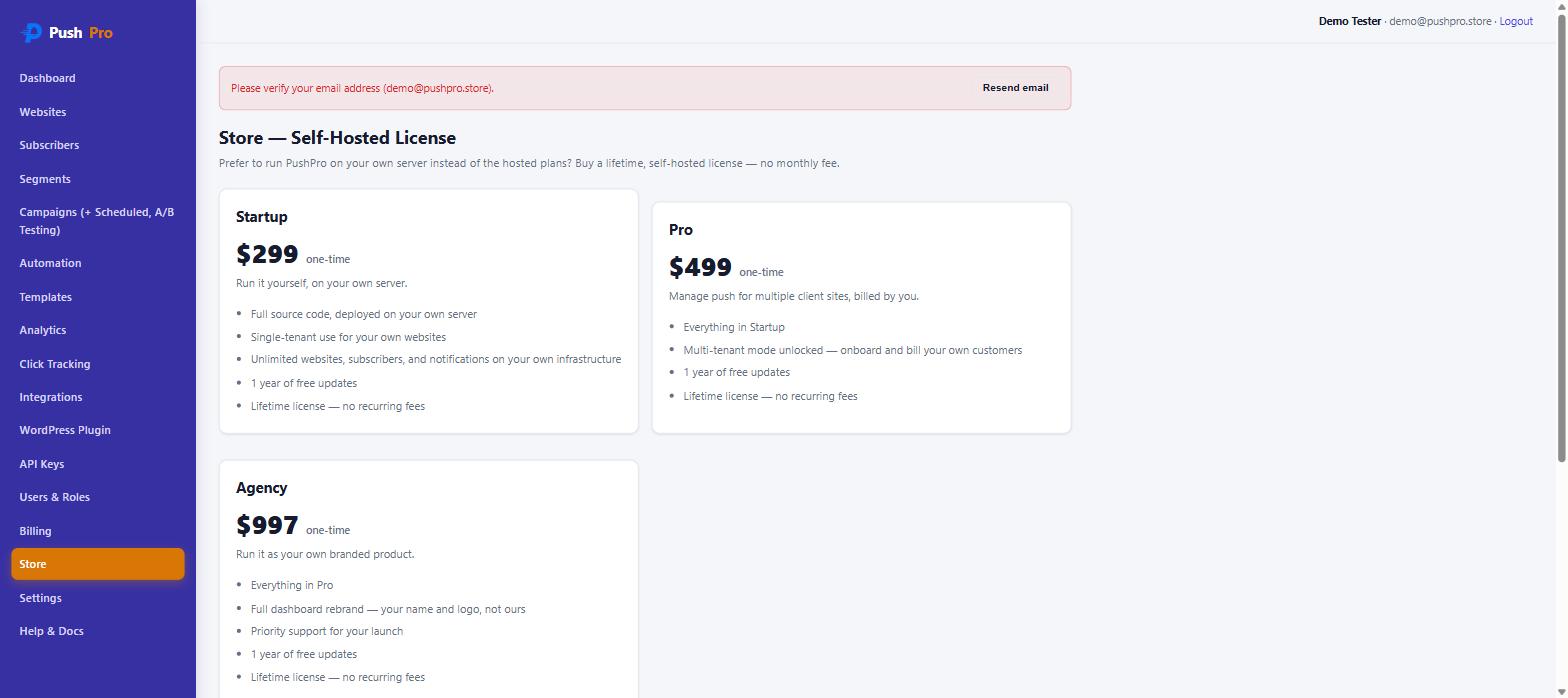
Buying a license is a completely separate transaction from any hosted plan you might already be on — it doesn’t change or replace a hosted account, it’s simply a different way to run the same software. Payment is handled the same manual way as plan upgrades: UPI for India, PayPal for everywhere else, verified by hand before the source code and license are sent over.
The distinction between Pro and Agency is worth pausing on. Pro’s multi-tenant unlock is the same multi-tenant architecture PushPro’s own hosted service runs on, handed to you as source code — enough to manage and invoice multiple client websites from one account, with your own team using the standard PushPro dashboard. Agency goes a step further: the dashboard itself carries your name and logo instead of ours, so an agency can stand up its own branded push-notification product on its own infrastructure, not just resell access to someone else’s tool.
Where to go from here
That’s PushPro end to end — the dashboard, subscribers, segments, campaigns, automation, analytics, API access, and the WordPress plugin that ties it all into the world’s most popular CMS with a plain plugin search. Every screen in this guide is exactly what you’ll see the moment you sign up; nothing here is a mockup or a “coming soon” placeholder.
If you want to try it yourself, create a free PushPro account and connect your first website — the Free plan is enough to install everything covered here and send your first real notification today.